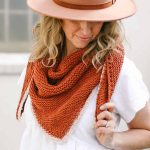
How to Knit a Triangular Scarf
Here's a summary of how to knit the "Just Getting Started" triangular scarf pattern above. Scroll up for the complete step-by-step instructions.
Cost: $20 - $30
Equipment
- CO – cast on
- k– knit stitch
- K2tog – knit 2 together
- KFB – Knit front and back in same st
- M1L – make 1 left
- M1R – make 1 right
- p – purl stitch
- PM – place marker
- rep – repeat
- RS – right side
- sk – skip
- st(s) – stitch(es)
- tog – together
- WS – wrong side
- yo – yarn over
Materials
Yarn
- Lion Brand Pima Cotton Weight: 4/medium – 186 yds, 3.5 oz/100 g)
- Color A – Spice 762/135 – 3 skeins [(approx. 270) g)]
- Color B – Mademoiselle 762/184P – 1 skein [(approx. 70 g)]
Additional Supplies
- Tapestry needle to weave in ends
- Size 10 6.0 mm 29-32 inch circular knitting needles or size to obtain gauge
- Size 8 5.0 mm 16-32 inch circular knitting needles or or 2 sizes smaller than larger circular needles
- 2 stitch markers
- Steamer or iron with steam function for blocking alternative: use a spray bottle
- T-pins blocking combs and blocking board (optional)
Instructions
How to Knit a Triangle Scarf Overview
- Cast on 3 stitches.
- Even rows: Knit all the stitches in the row.
- Odd rows: Increase at the beginning and end of each row. These rows alternate by adding two stitches and then four stitches each time.
- Continue in this pattern until desired triangle scarf sized is reached.
- (Optional) Work a row of eyelets to create a pretty decorative edge at top if triangle.
- Cast off all stitches.
- (Optional): To add a border to the two shorter triangle sides, pick up stitches along each side.
- Knit in seed stitch until 5 rows are complete.
- Bind off and weave in ends.
- Lightly block your knit triangle scarf to smooth out the stitches and create straight edges.
Notes
- Scarf is knit from the bottom triangle point. Increases are made every odd-number row. Every even-numbered row is knit without increasing.
- Since this is made with a reversible knit stitch, there is no true right or wrong side. The labels for each row are there only to help you keep track of increases, but the final triangle scarf is reversible.
- Some increase rows add two stitches and some add four stitches, so the increase stitches are worked in two ways:
- Yarn over (yo) on each end will result in 2 more sts per row.
- Knit front and back (KFB) means that you knit in the front and back of the same stitch. Combining a yo and KFB in the same row will result in 4 more sts per row.
- Gauge is not critical for this scarf, but meeting the pattern gauge will help ensure your project turns out the expected size and uses the listed amount of yarn. If you’d like to skip the gauge swatch, just measure your work-in-progress scarf after about Row 30 and compare your stitch measurements to the gauge listed above.
- Tip for beginners: If you’re new to knitting, you may skip the scarf border or add a simple crochet border instead. Check our our favorite crochet border stitches for ideas.