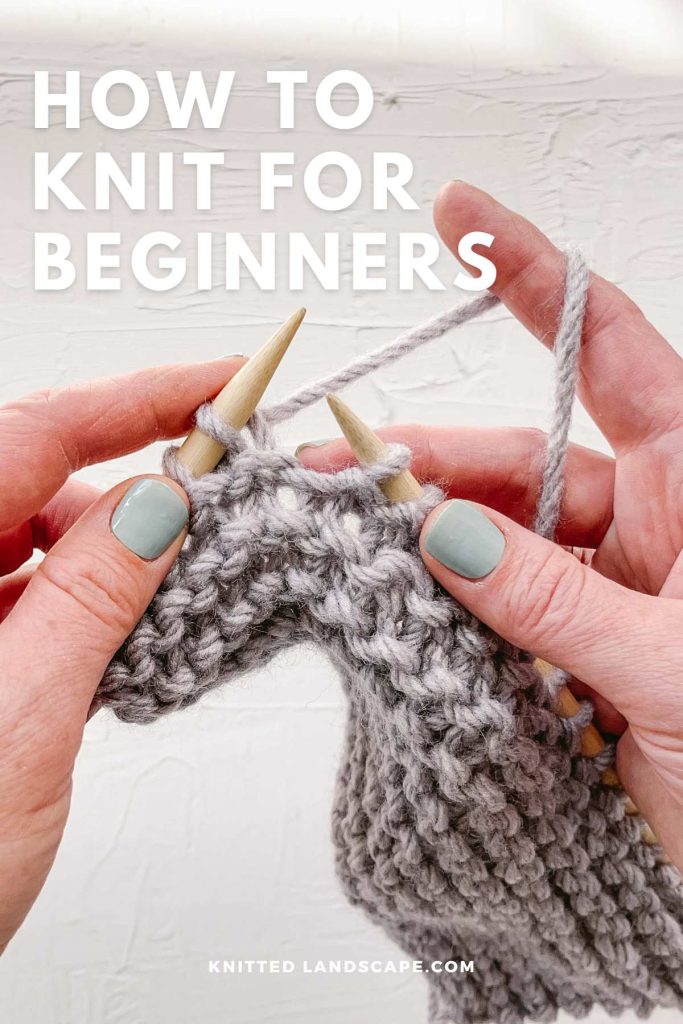
How to Knit: An Easy Beginner’s Guide
Learning how to knit is an exciting journey. This beginners guide to knitting will equip you with everything you need to know to start knitting with confidence.
From essential supplies to step-by-step instructions, we’ll demystify how to knit and you’ll be creating handmade projects in no time.
All you need for now is yarn, knitting needles, and a little bit of enthusiasm!
All About Beginning Knitting
Before we learn to knit, I want to cover a few knitting basics that I get a lot of questions about.
What is Knitting?
Knitting is a relaxing and productive pastime that uses two pointed needles to weave strands of yarn into fabric. This centuries-old hobby is an engaging and evolving practice with an ever-growing community of modern crafters around it.
Is It Hard to Learn How to Knit?
Learning how to knit can be straightforward with the right attitude, supplies, and information. Absolute beginners can learn knitting basics in just a few hours.
If you have experience with similar fiber arts, like crochet, knitting can be an easy hobby. As with any new activity, learning to knit like a pro requires practice, perseverance, and patience.
Picking a project suitable for your level, which we’ll talk about next, is crucial in developing your ability and confidence.
Beginner Tip: Remember that knitting is a learnable skill, not an inborn talent. The more you practice, the easier it will get.
What Can Beginners Make Easily?
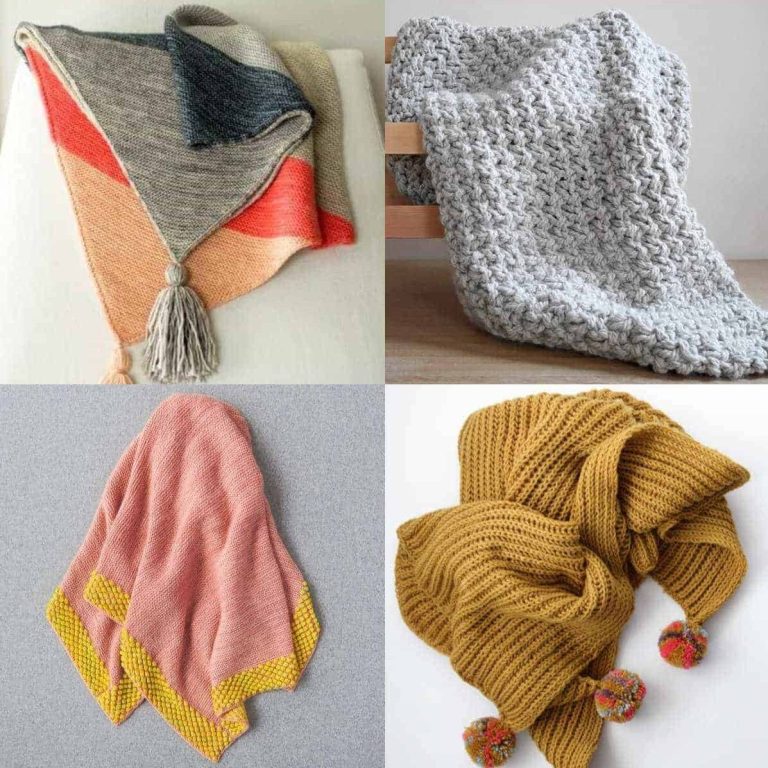
The best projects for knitting beginners involve squares or rectangles: scarves, dishcloths, and throws. Knit newbies can create larger items like blankets by crafting individual smaller shapes and joining them together.
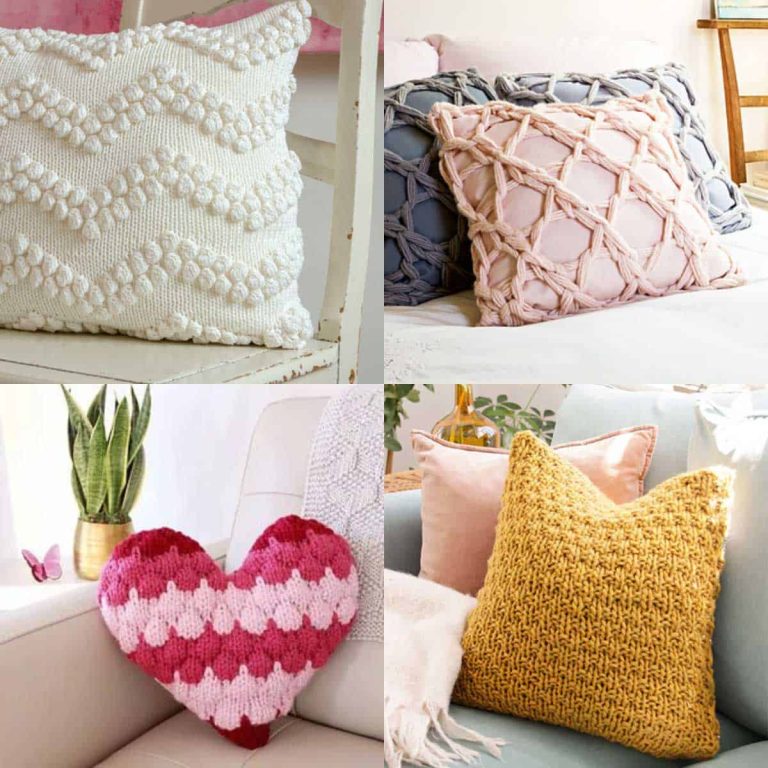
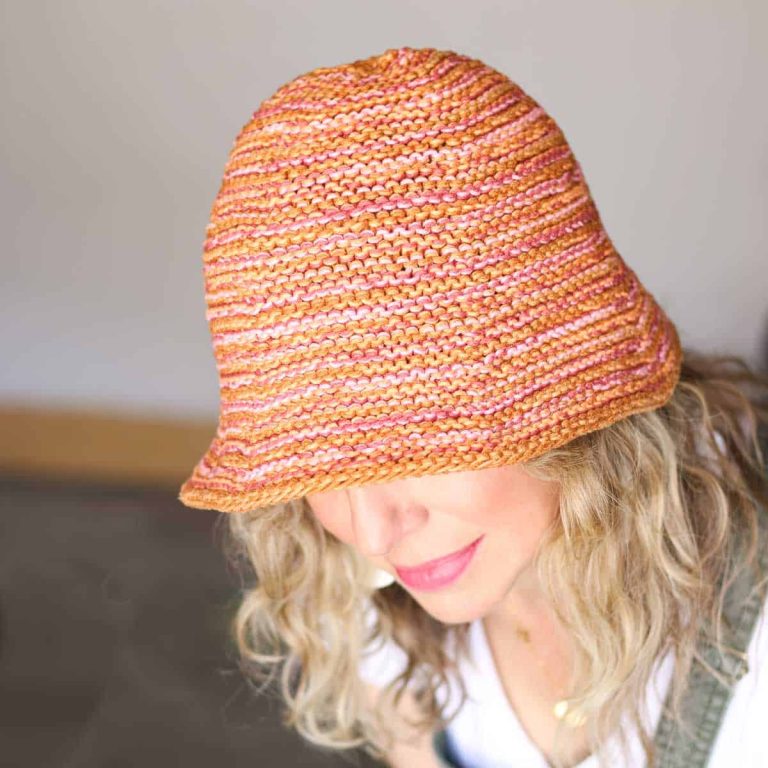
Once you gain confidence with your skills, you can start making knit baby hats, fingerless gloves, and even modern throw pillows.
What Do You Need to Knit? – Essential Supplies
For basic knitting, your kit needs just a few essential supplies. Yarn and needles are the most important items when learning how to knit. You’ll find these at any local craft store.
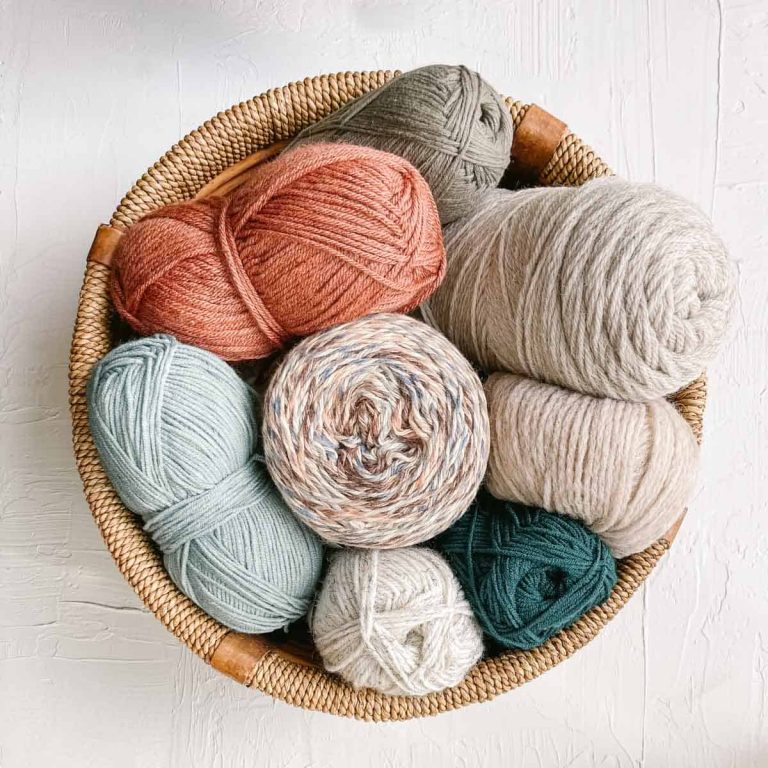
Yarn
Choosing the right yarn will improve your experience of learning how to knit, as well as the success of your project.
The two main features of yarn to get familiar with are weight and fiber. Beginners should use these factors to prioritize picking a product that’s easy to work with.
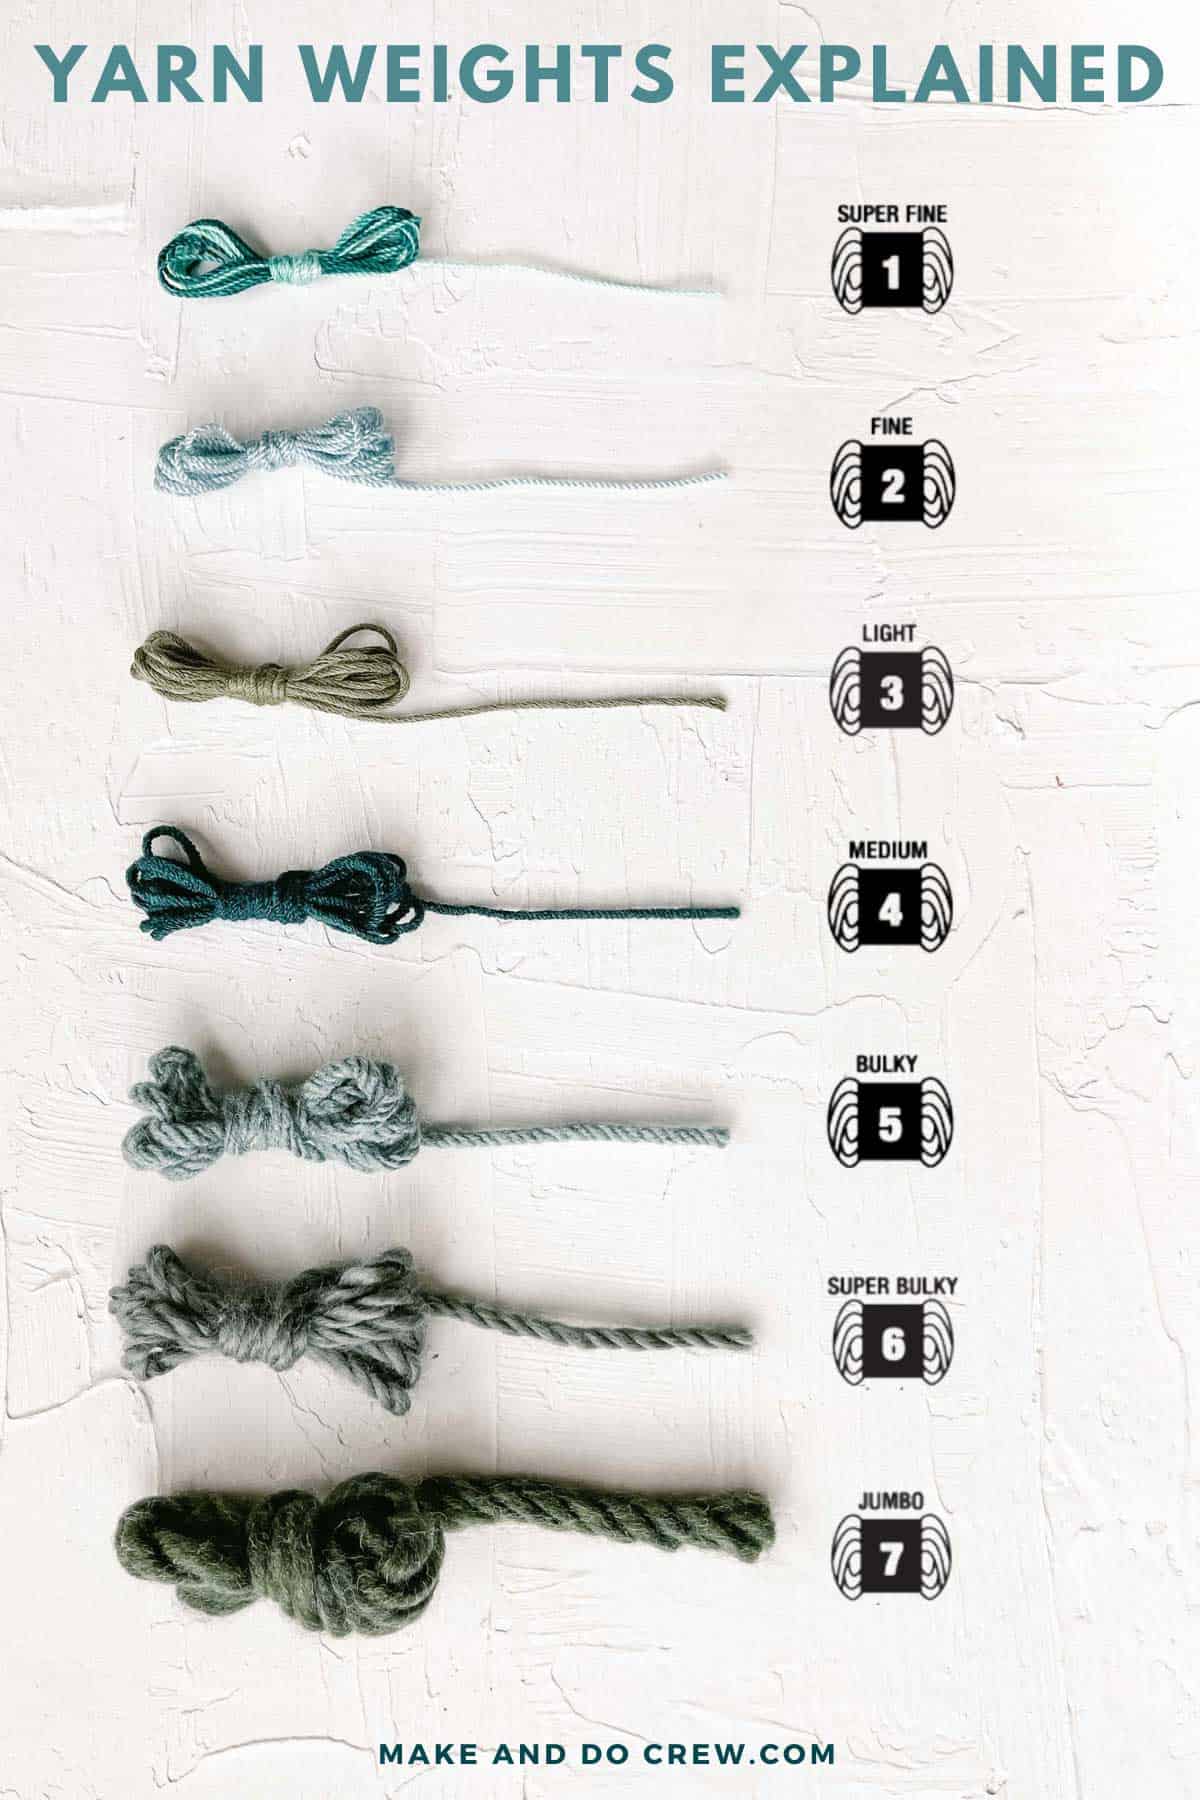
Yarn Weight
At first, the most important characteristic to consider is yarn weight. Here are common classifications:
Knitters often use specific words to refer to these categories:
- Super fine – fingering or sock weight yarn
- Fine – sport-weight yarn.
- Light – double knit (DK) yarn
- Medium – aran or worsted weight yarn
- Bulky – chunky yarn
- Super bulky – roving yarn
- Jumbo – jumbo roving yarn
Thicker yarns like bulky and jumbo are easier to handle and make for quicker projects, as each stitch you make takes up more room than with a thinner strand.
When learning how to knit, I recommend picking a medium-weight yarn or thicker that keeps the same thickness throughout.
Yarn Fiber
The type of fiber used to make yarn can be split into two basic categories: natural and synthetic.
Natural fibers may come from organic sources such as cotton or animal sources such as alpaca, cashmere, or wool.
Synthetic yarns, including nylon and polyester, are generally machine washable and dryable on regular settings as they do not shrink.
Blended versions are also available. These handy yarns combine the draping qualities of organic yarns with the ease of washing synthetic options. Always follow the care instructions on the yarn label of your chosen product.
Picking the Right Yarn For Your First Project
Avoid fuzzy, boucle, faux fur, or novelty yarns, as they are harder to work with. Opting for a wool yarn or blend of wool and acrylic can work well for new knitters.
I suggest purchasing a set of wooden needles in US size 7 or 8 and a medium-weight yarn for your practice stitches. You’ll know you’ve found the right thickness when you see a number four on the label (often inside the silhouette of a yarn skein).
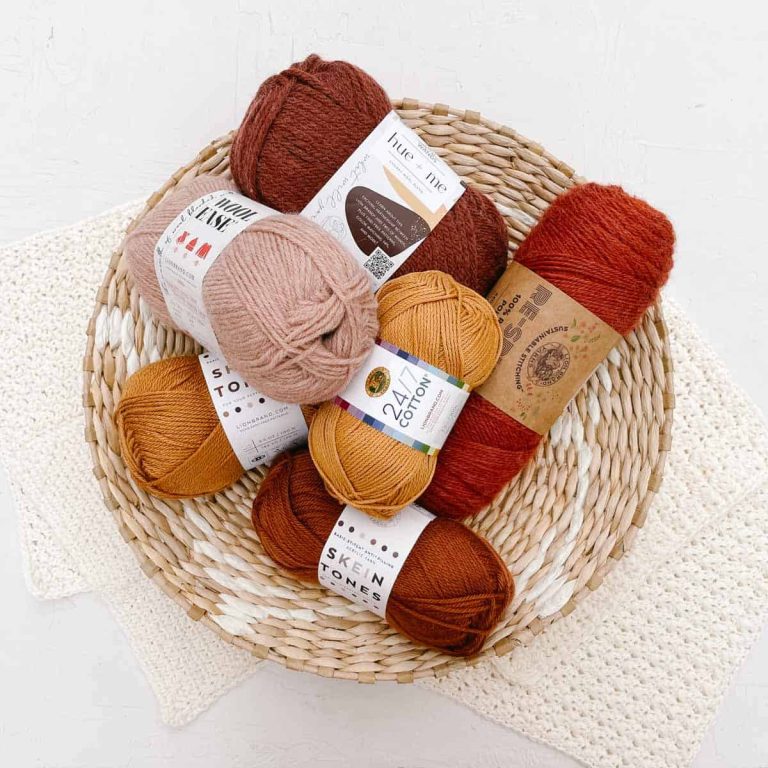
As you progress beyond your first practice swatches, here are some of my machine-washable and dryable yarn recommendations for beginner knitting:
| Yarn | Weight |
|---|---|
| Lion Brand Color Theory | Worsted weight (CYC 4) |
| Lion Brand Hue + Me | Bulky (CYC 5) |
| Lion Brand Wool-Ease Thick & Quick | Super bulky (CYC 6) |
Beginner Tip: Avoid expensive yarns for your first knitting projects. Mistakes will happen, so it’s best to give yourself room to make them without adding unnecessary pressure.
Knitting Needles
Consider shape, size, and material when choosing your first knitting needles. Let’s dive into understanding these features.
Straight or Circular Needles?
You’re probably familiar with the idea of classic, straight knitting needles. These needles are perfect for projects like simple scarves or beanies.
Have you ever wondered how crafters make shaped items such as infinity scarves and socks? This is where circular needles come in handy.
Because there is a cable connecting both needles, it allows you to do what crafters call ‘knitting in the round.’ This is how we make pieces with curves.
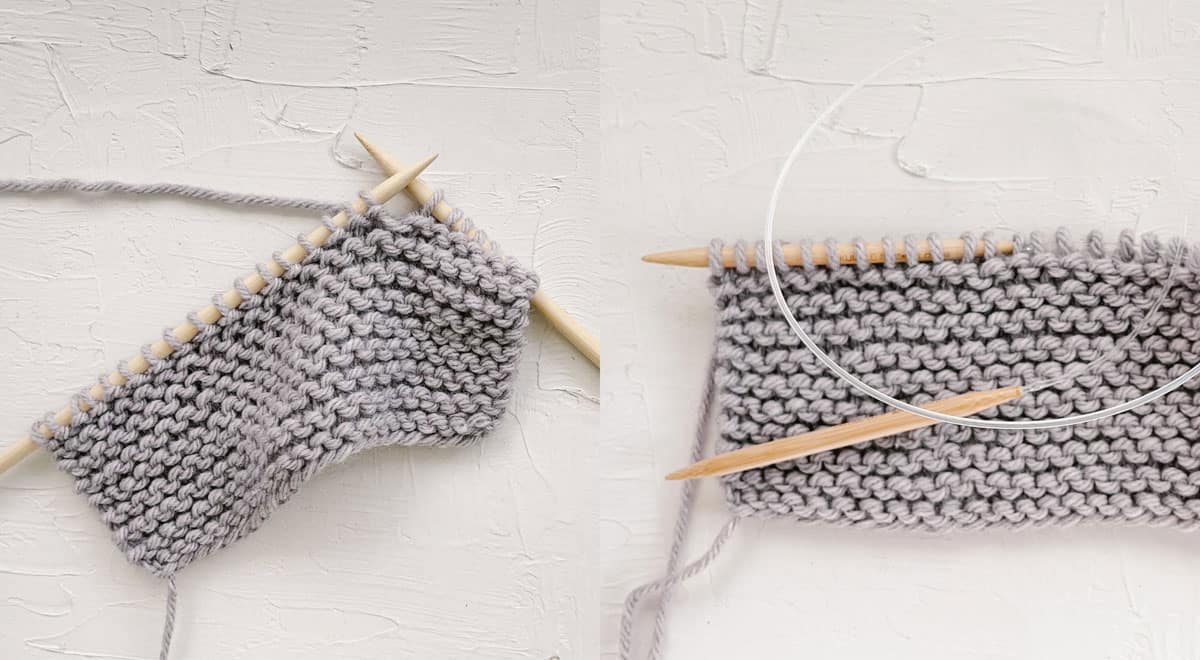
Top Tip: You can use circular needles to knit in the round or in flat rows. Because they work for both techniques, circular needles are a great option if you aren’t ready to invest in a bunch of different knitting supplies.
Your wrists will also thank you as the cable holds the weight of your growing project.
Needle Sizing
When knitters speak of needle size, they usually mean thickness. Needle circumference has numbered size categories in the US and metric measurements in many other countries.
Medium-thick needles are perfect for beginners. Try out needles between sizes six (4mm) and eight (5mm). When in doubt, look at your yarn label for guidance on what size needles to use.
Since your first project probably isn’t a king-sized afghan, you won’t need super long needles. When learning to knit, 10-inch straight needles or 16-inch circular needles will be practical and manageable. These are common sizes that you should be able to find easily.
Why does needle size matter? In both straight and circular knitting needles, the needle circumference (thickness) affects the size of each stitch. The length dictates how many stitches can fit on the needles.
Needle Materials
Wooden and bamboo needles are ideal for learning how to knit. The friction these materials produce means the yarn is less likely to slip, so you will have more control over your stitches.
Tapestry Needle
Tapestry needles are specifically designed for yarn crafts, with large eyes to fit the thickness of the yarn. For any project where you have switched skeins or made color changes, you will need a tapestry needle to weave in the loose ends. These needles are also useful for seaming pieces together.
Many tapestry needles are blunt to help protect the fabric. You will also find bent tapestry needles, which make weaving in loose ends easier. When buying a needle, the most important thing is that the eye is large enough to thread your chosen yarn through.
Stitch Markers
While not absolutely essential, I recommend having stitch markers in your kit from the get-go. These handy little clips will help keep your place when tracking stitch and row counts.
For example, hook one of these convenient markers onto every tenth row to make recounting easier. If you need to seam, stitch markers can double as pins to hold the sections together while you work.
Scissors
As you simply need to cut the yarn, any scissors will do. However, it is a good idea to keep a special pair ready with the rest of your supplies. Getting a small pair of folding scissors is a good option if you travel regularly because they’re usually allowed on airplanes.
3 Steps to Learn How to Knit
Once you have your supplies prepped, it’s time to start knitting. Let’s break down your first project into three steps:
- Cast on.
- Rows of knit stitch.
- Bind off.
Common Terminology
In knitting instructions for beginners, you will see the phrases ‘working yarn’ and ‘tail.’ Working yarn means quite literally the yarn you’re knitting, or working, with. This is the yarn that leads back to the ball or skein. The tail is the other loose end of the yarn that’s leftover from casting on.
How to Hold Your Needles and Yarn
If you’re new to fiber crafts, handling both needles and yarn at the same time may be challenging at first. Focus on getting comfortable with using both hands to work with your knitting materials. Right- and left-handed people can learn to knit with the same methods that I explain here.
Holding the Needles
There is no right or wrong way to hold your knitting needles. Two basic and popular ways are the overhand and underhand grips.
The overhand method is similar to holding a knife while eating. This grip has your palm facing down toward the needle.
If you have ever written with a pencil, you’ve been practicing the underhand method, or “pencil grip.” For this method, the needle is held mostly by the thumb and forefinger and rests in the space between these two digits.
Don’t worry if either style feels awkward at first; this is an activity where practice makes perfect. Experimenting to find your personal preference will help you settle into an enjoyable knitting rhythm.
Holding the Yarn
When you knit, you’ll likely find yourself using your fingers to help manipulate the yarn and the stitches. As you progress in your knitting journey, you’ll notice that how you hold the working yarn affects knitting tension. Keeping the working yarn taut will help give you neat, even stitches.
The two most popular ways to hold the yarn are called English and continental, sometimes known as German. The photo tutorials in this guide demonstrate the continental method.
Is Continental or English Style Better for Beginners?
The difference between the continental and English styles is which hand holds the working yarn. For the continental method, shown below, the working yarn is held in the left hand and picked up with the needle to make new stitches. Tension is created by wrapping the working yarn around the fingers of the left hand.
In contrast, people refer to the English method as ‘throwing’ the working yarn counterclockwise over the needle with the right hand. Weaving the yarn through the fingers of this hand keeps it taut.
When knitting continental, I like to pass the yarn over my left index finger, as shown in this picture, and then wrap it around my pinky finger. This helps keep the tension when knitting. When you’re just learning, try a few ways of wrapping the yarn to keep it taut and find what works for you.

That said, I strongly suggest learning the continental method of knitting first. Why? This method requires smaller hand movements, so it tends to be faster and gentler on the hands.
Since the left hand controls the working yarn, lefties may find the continental style easier to master. Crocheters also often find the continental style more straightforward since they’re already used to holding yarn in the non-dominant hand.
If you originally learned English style, you may be quite fast at knitting this way. Every knitter has their own style, so if one method doesn’t feel comfortable, play around to find the best way for you.
How to Cast On
Casting on is the process of making loops of yarn on your needle to become your first stitches. Your chosen pattern will tell you how many stitches to cast on.
There are a few different ways to cast on. I suggest that beginners learn the long tail cast-on technique. This method is quick and creates an elastic edge. Long tail cast-on works well for projects that start with garter stitch, which we will learn next.
Long Tail Cast On Step-by-Step
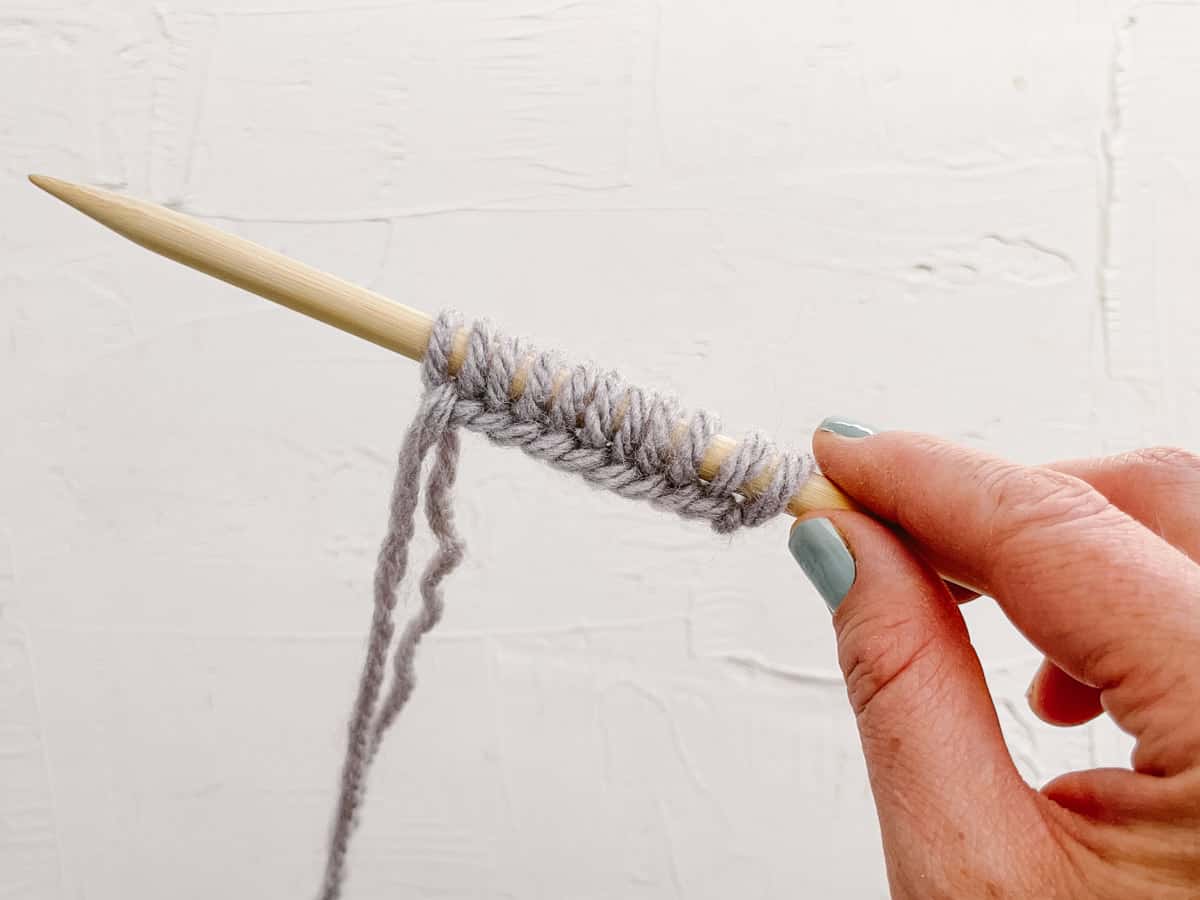
Before you begin the cast on, roughly measure out a length of yarn for your long tail. To do this, wrap the yarn around your needle the same number of times as the amount of stitches you need.
Next, pinch your fingers where the wrapping ends on your yarn and unravel the yarn off the needle. The length between where you are holding and the end of the yarn is how much you will need for your long tail cast on.
- Now that you have the length of your tail, tie a slip knot. Do this by making a loop in the yarn, an inch or two closer to the ball than where you pinched before. Insert your thumb and index finger through the loop and grab the working yarn. Pull it through the loop to form a new, smaller loop. Slide this second loop onto your needle. Tighten if necessary by gently pulling the tail end of the yarn.
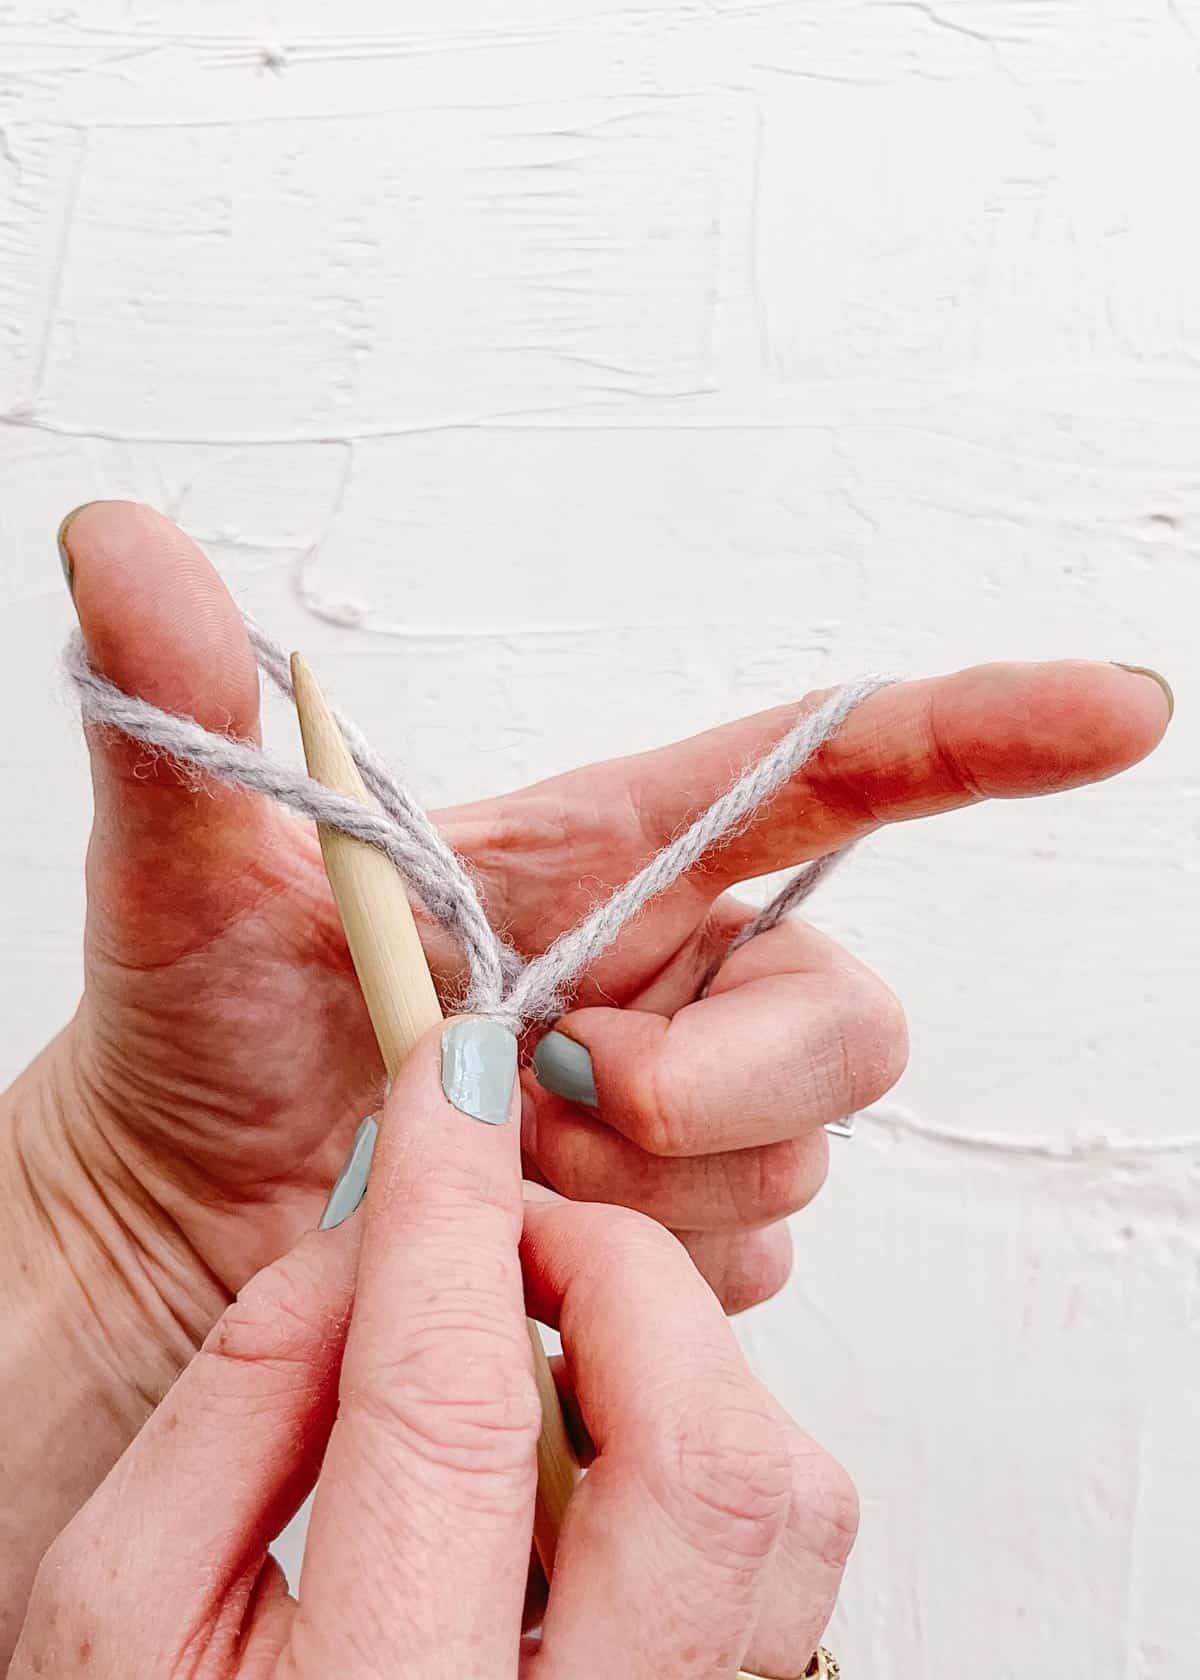
- Then, take the needle in your right hand. Hold the two yarn threads down with the middle and ring fingers of your left hand. Separate the yarn with your left index finger and thumb. Create tension in the yarn by holding these two fingers straight. Angle the needle upwards.
- Scoop the needle underneath the loop of yarn around your thumb. Bring the needle upwards through the center of the loop.
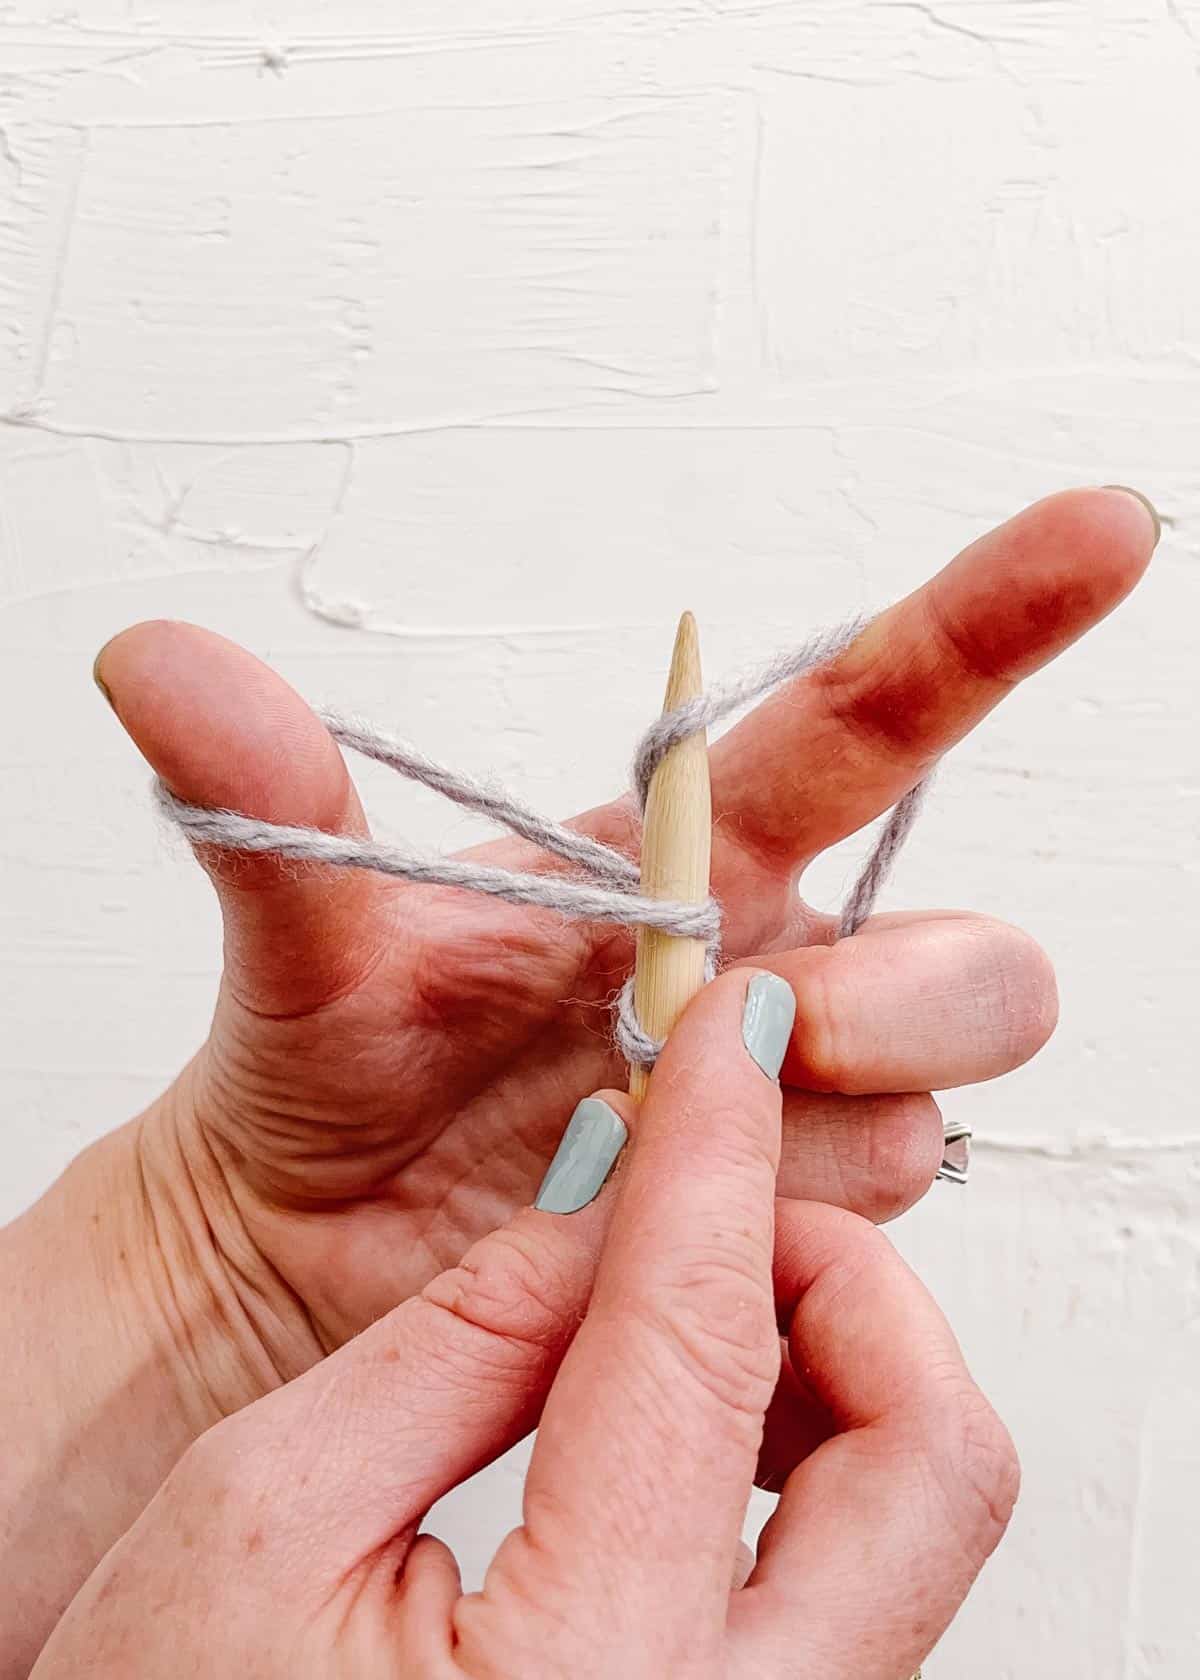
- Next, swing the needle up behind the strand of yarn in front of your index finger.
- Move the needle downwards, bringing the yarn back through the original loop around the thumb.
- Finally, gently tug on the long tail to secure the new stitch snugly on the needle. Resist the urge to overly tighten your stitches at this point. Doing so will make knitting the first row far more difficult. Below, I’ll share a tip on how to solve stitches cast on too tightly.
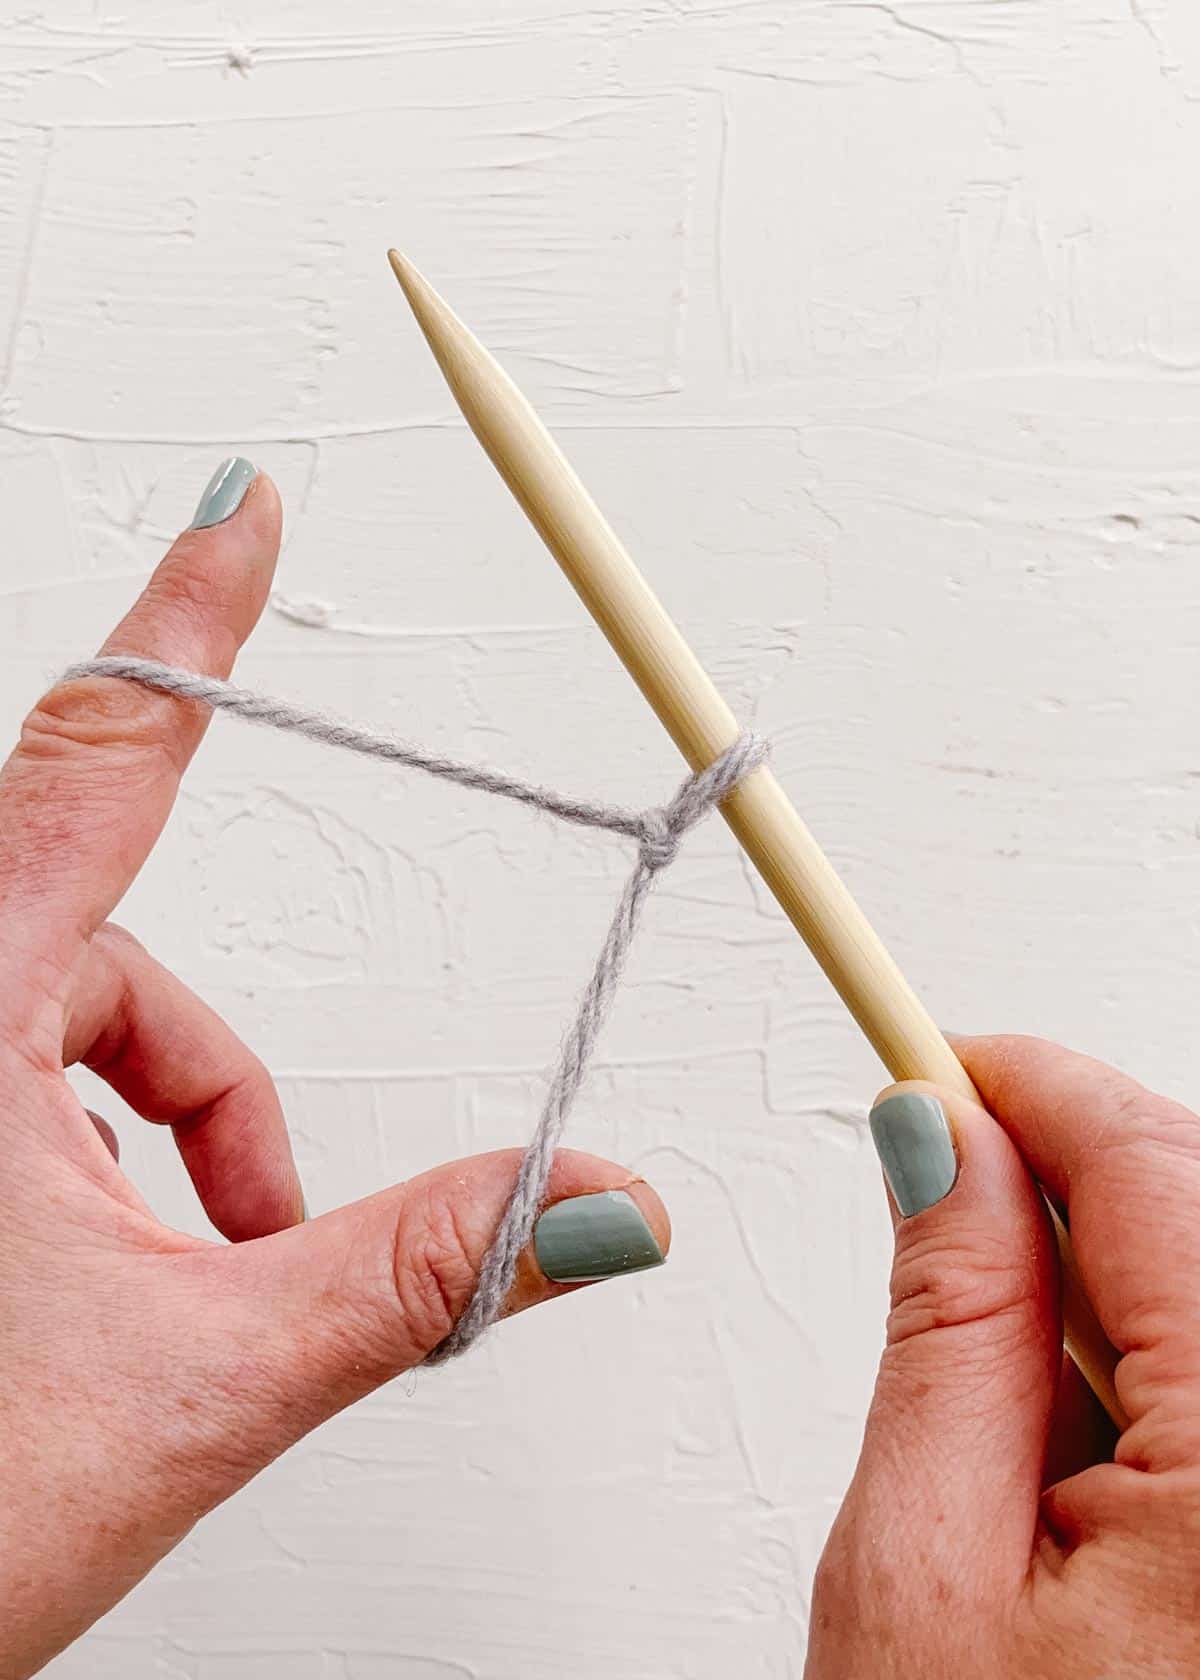
Create a slipknot around your needle.
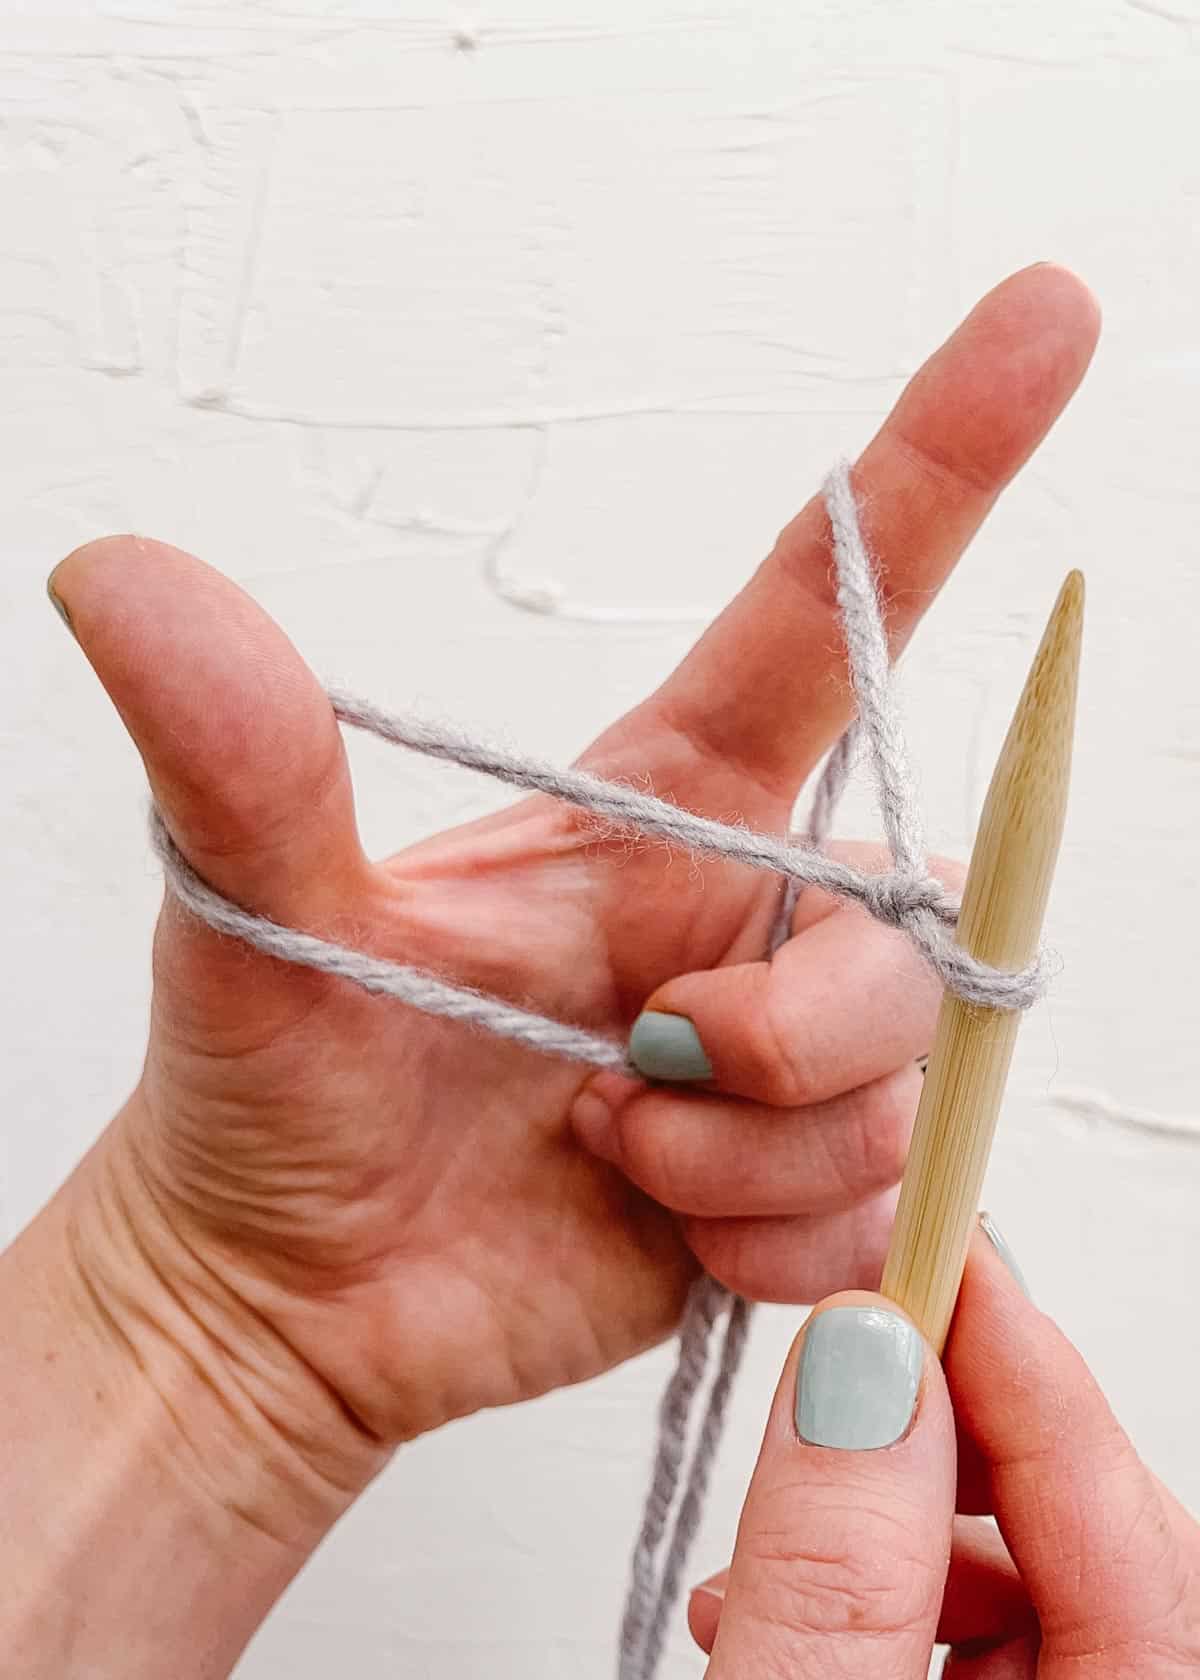
Separate the two ends of the yarn with your thumb and index finger.
Bring the needle through the center of the loop around your thumb.
Scoop the needle behind the yarn in front of your index finger.
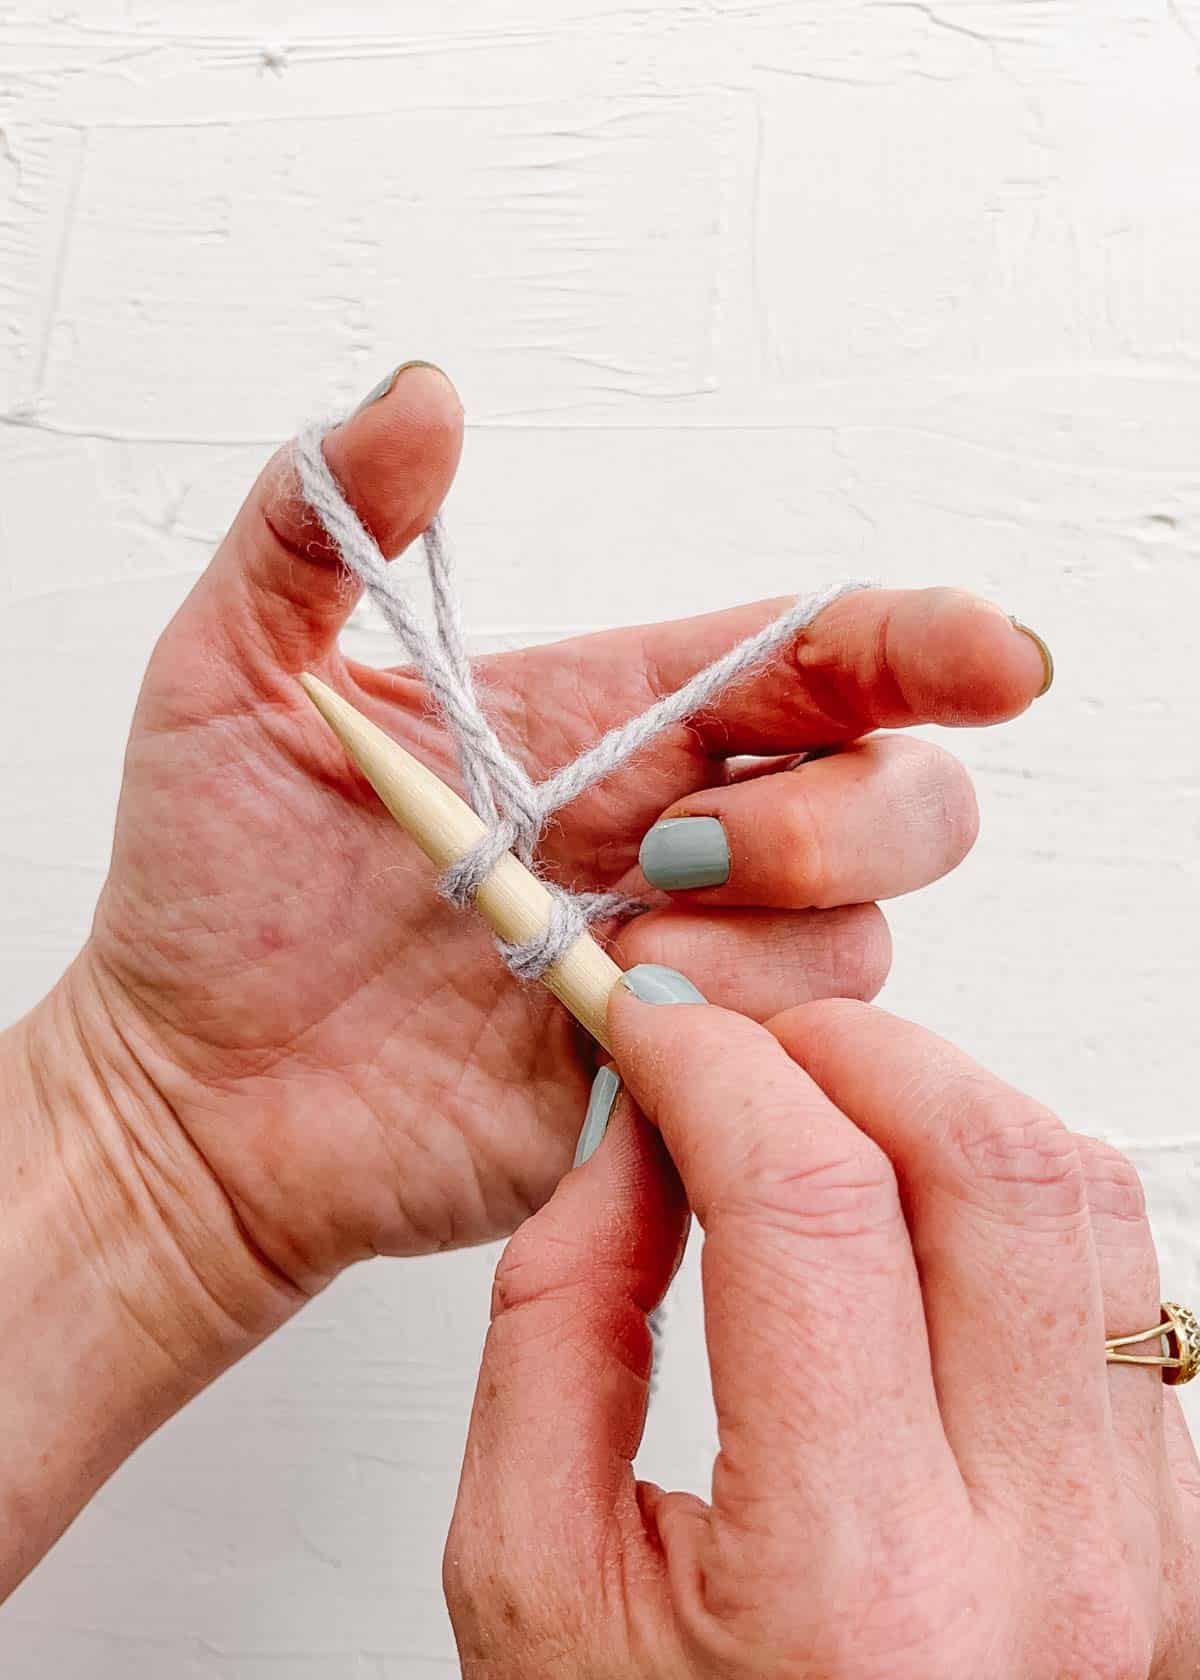
Swing the needle down, pulling the yarn back through the original loop around the thumb.
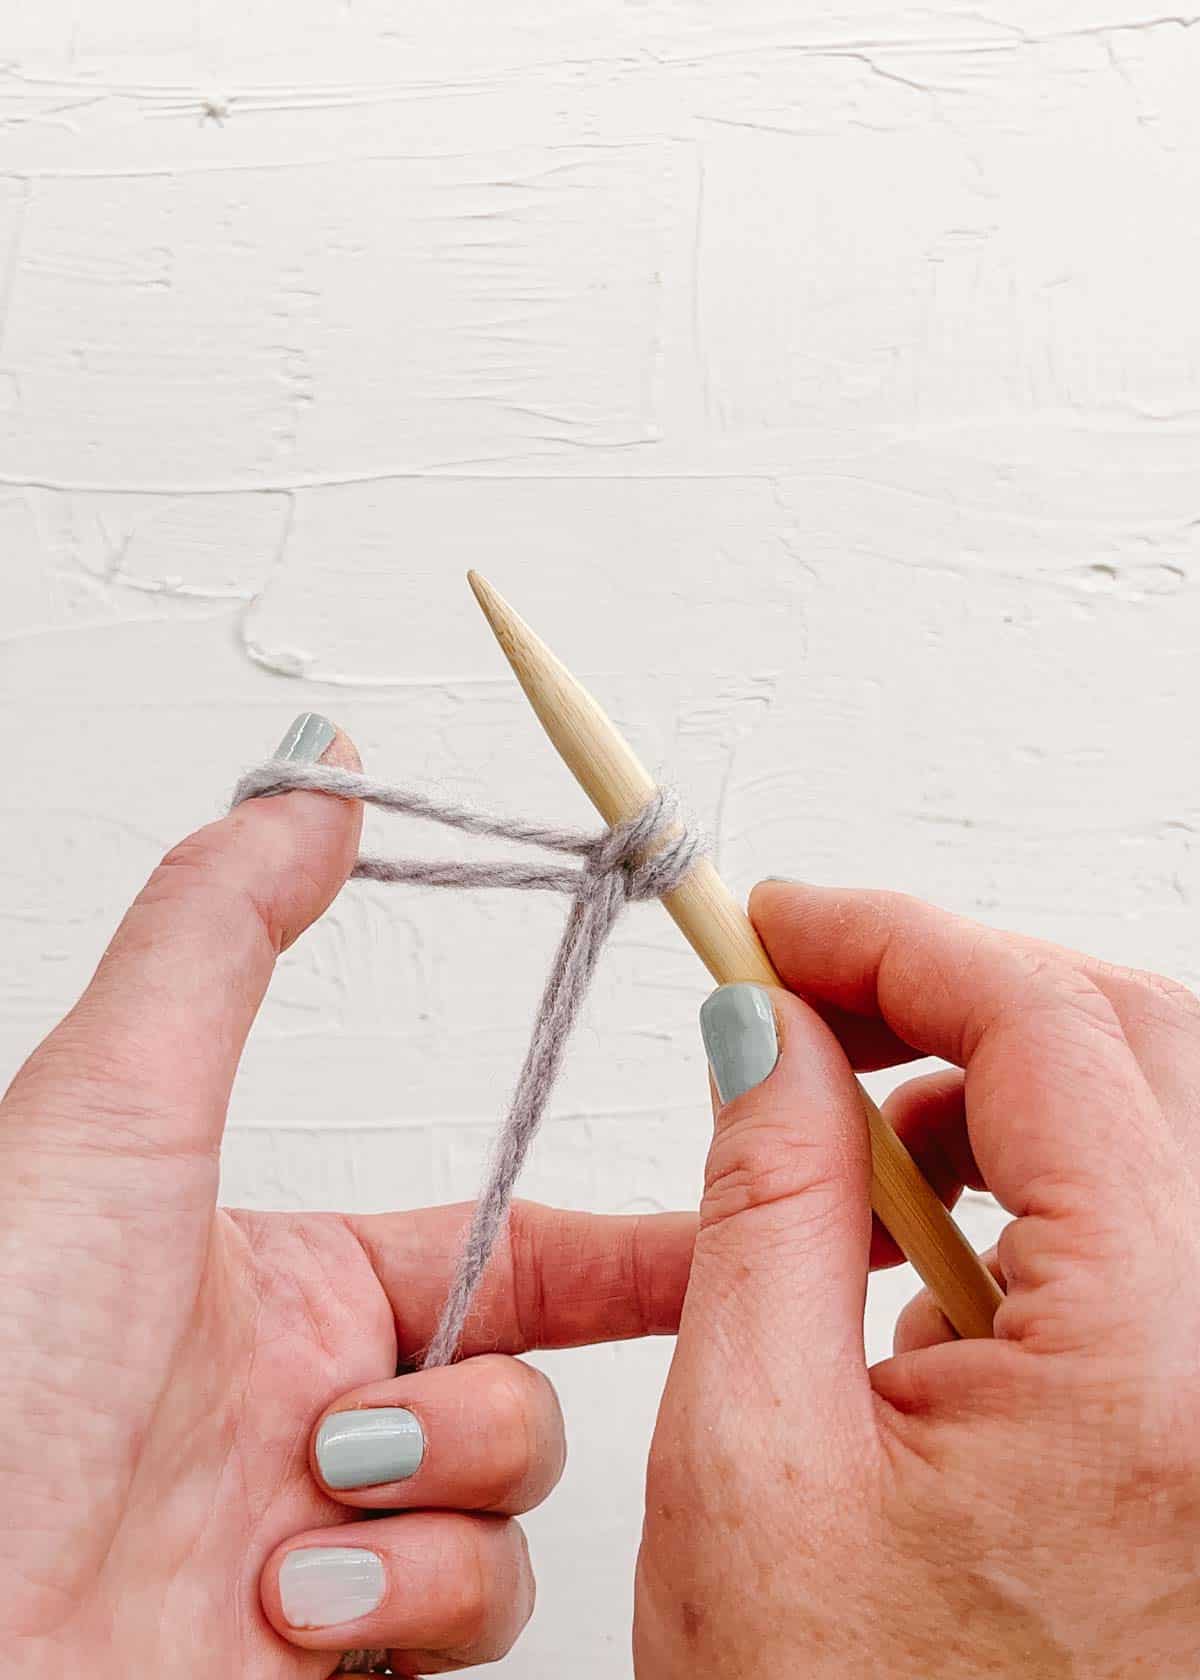
Secure the new stitch on the needle.
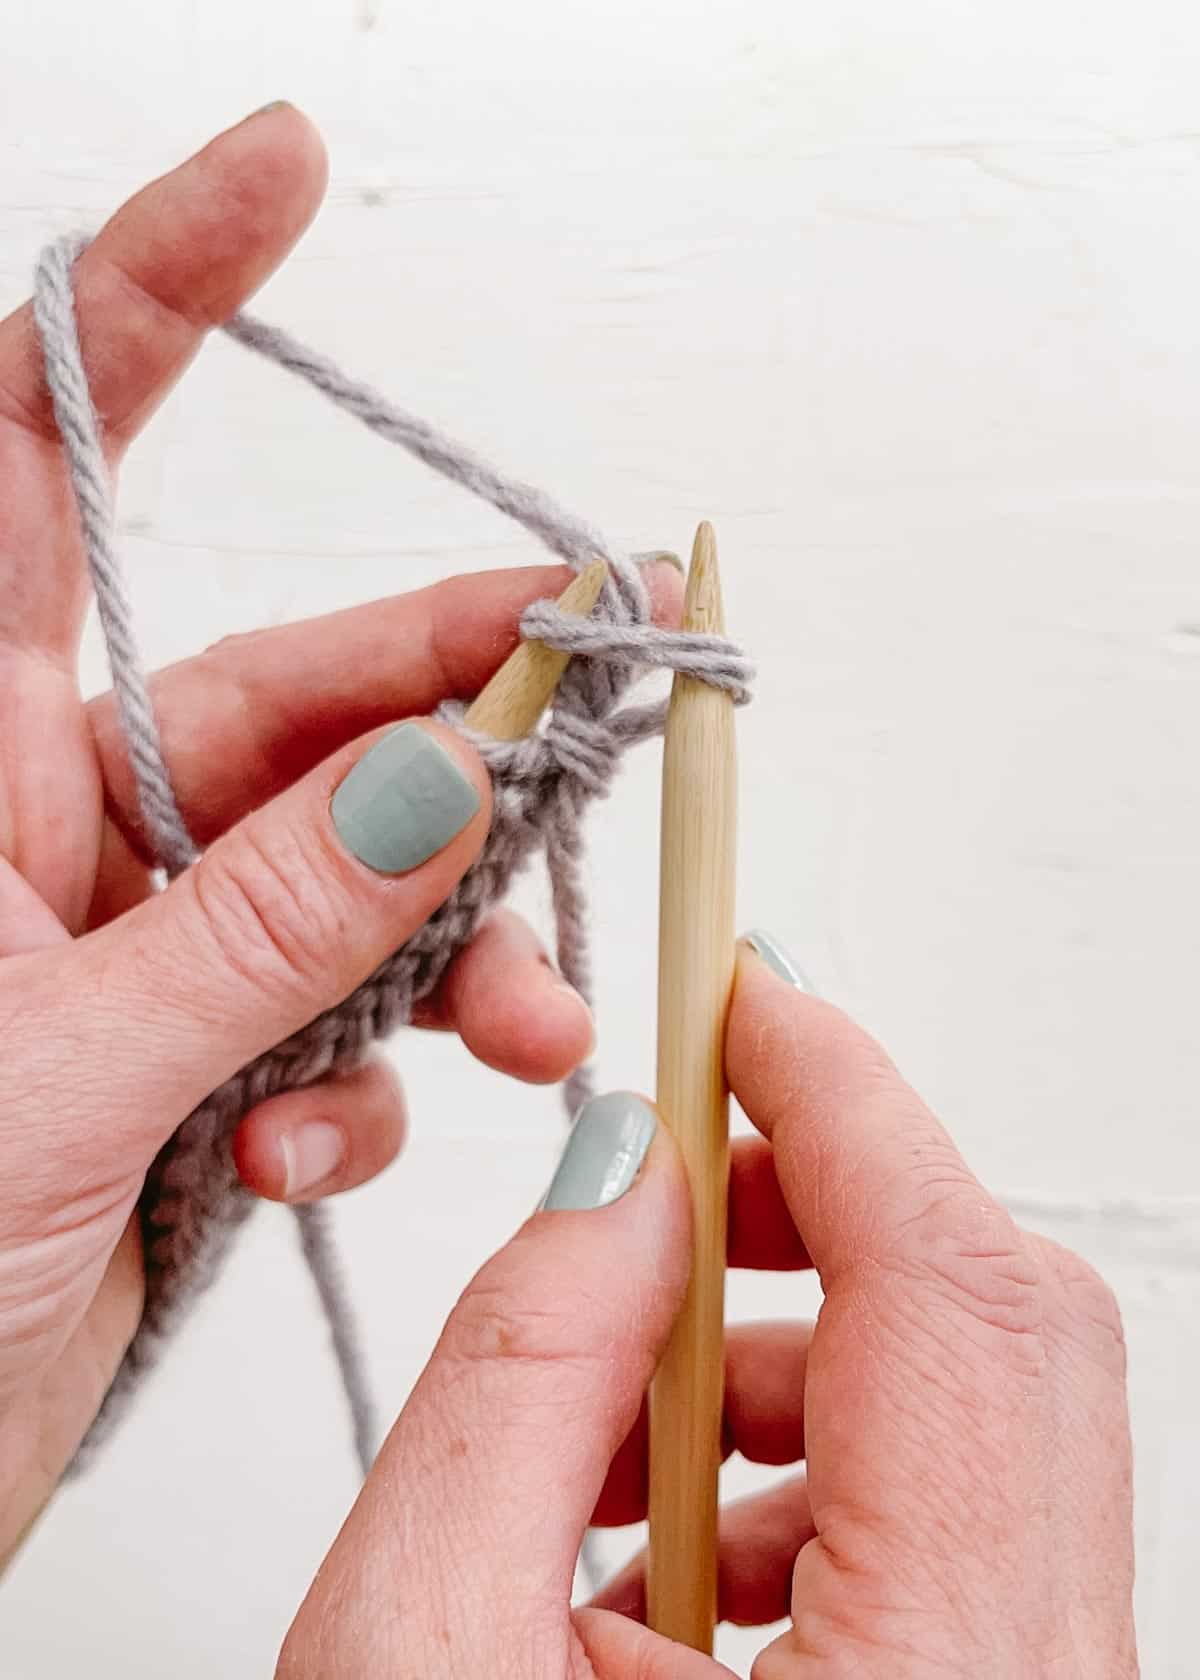
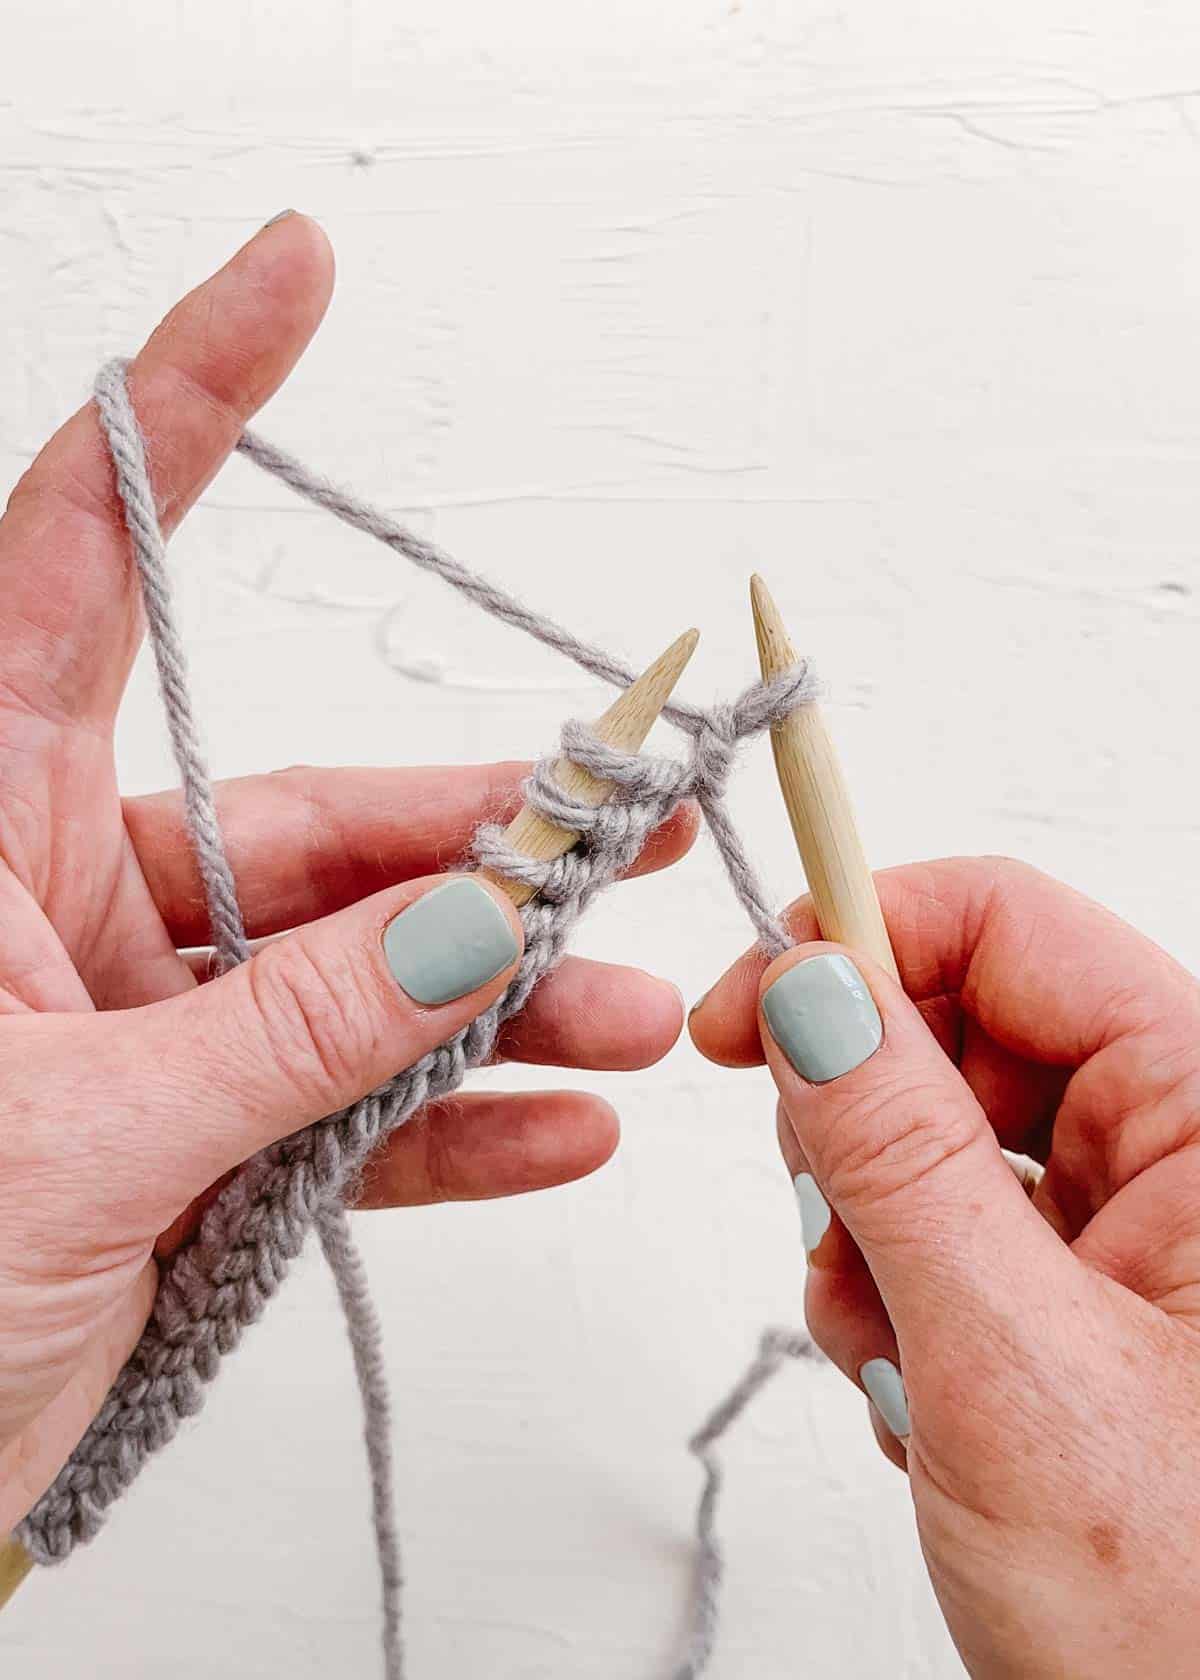
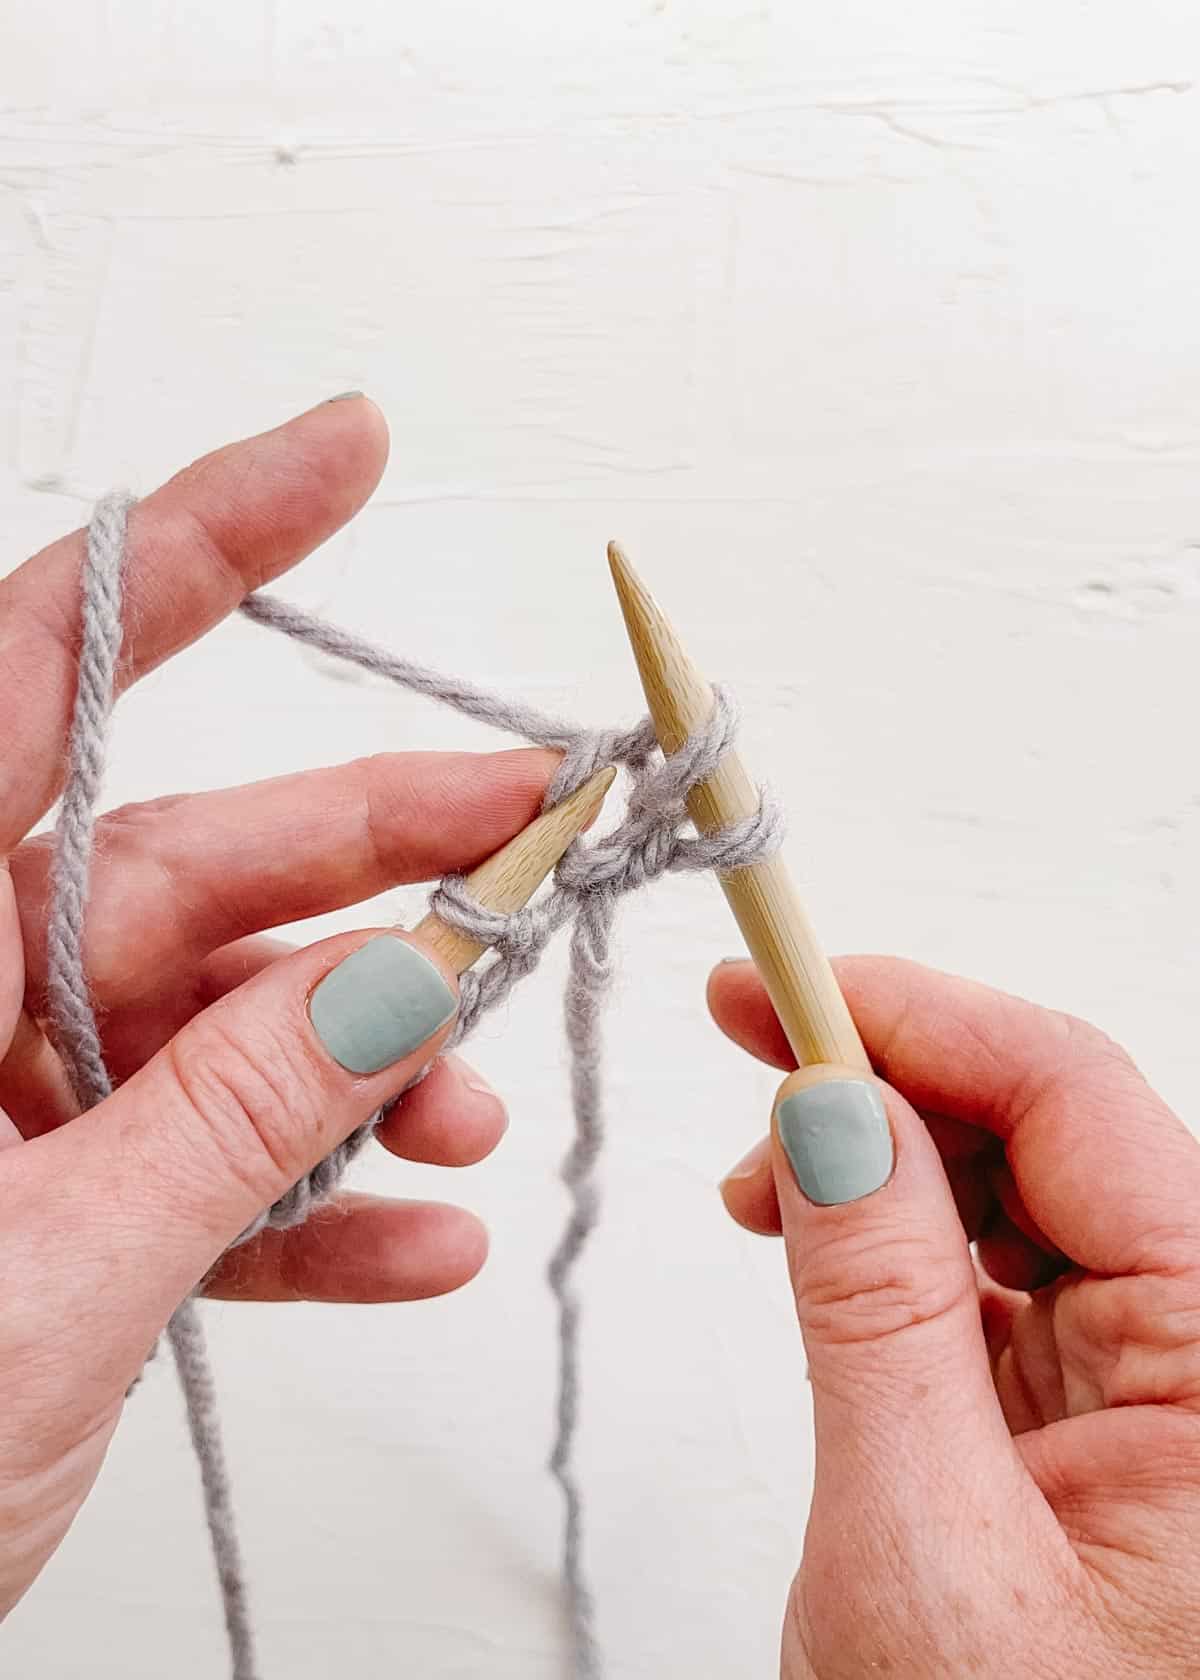
Tips and Tricks: Looser Cast On
A common problem for new knitters is casting on stitches that are too tight. This tension makes it harder to insert the needle when it’s time to make the first row of stitches.
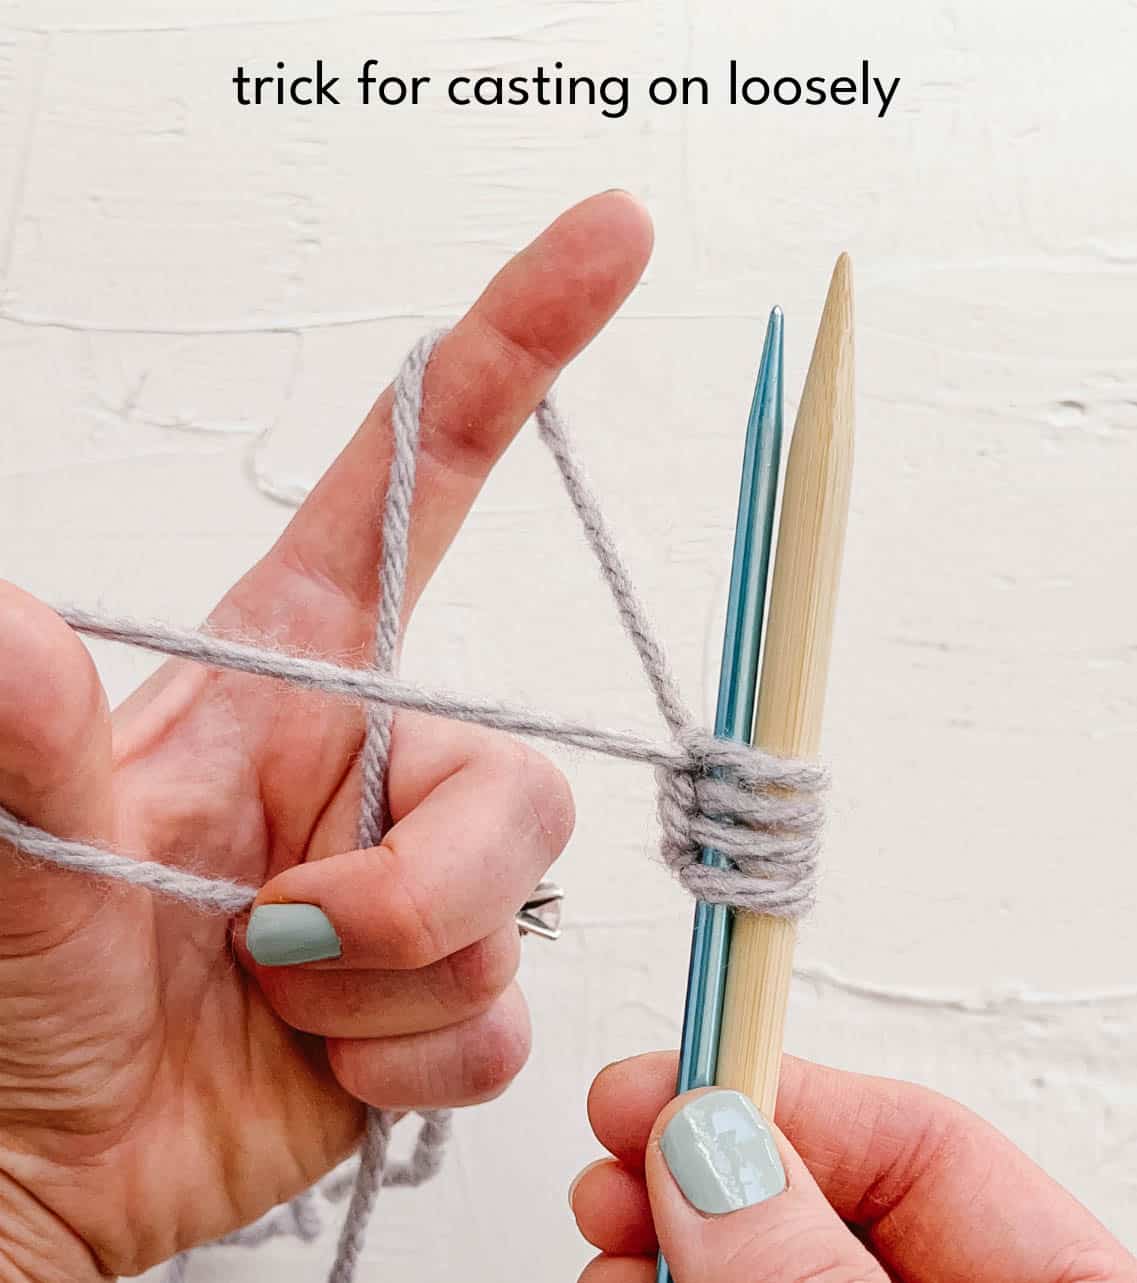
If you’re noticing you tend to cast on too tightly, here’s what you can do. Simply hold a thinner needle beside your main needle while casting. Once you have the correct number of stitches, slide the extra needle out. Now you have more room between the loops and your needle.
How to Make a Knit Stitch
The knit stitch is the cornerstone of knitting and something you will see in patterns repeatedly. Even complex stitches and unique stitch repeats often use the humble knit stitch as a foundation.
Beginner Tip: Written instructions refer to this stitch as k. A number following this k, like in k1, means to make that many knit stitches – in this case, knit one.
Garter Stitch
Repeating rows of the knit stitch produces a pattern we call garter stitch. This stitch forms a ridged fabric that does not curl. Garter stitch is a perfect first stitch for beginners to practice so that you can concentrate on mastering how to make knit stitches.
Another advantage of garter stitch is that the end result is a reversible knit fabric. For this reason, it looks fantastic in projects like scarves and blankets.
How to Make a Knit Stitch Step-by-Step
Once you have your cast on ready, it’s time to knit your first stitches. First, we will practice making knit stiches along the entire row to get used to the motion of knitting.
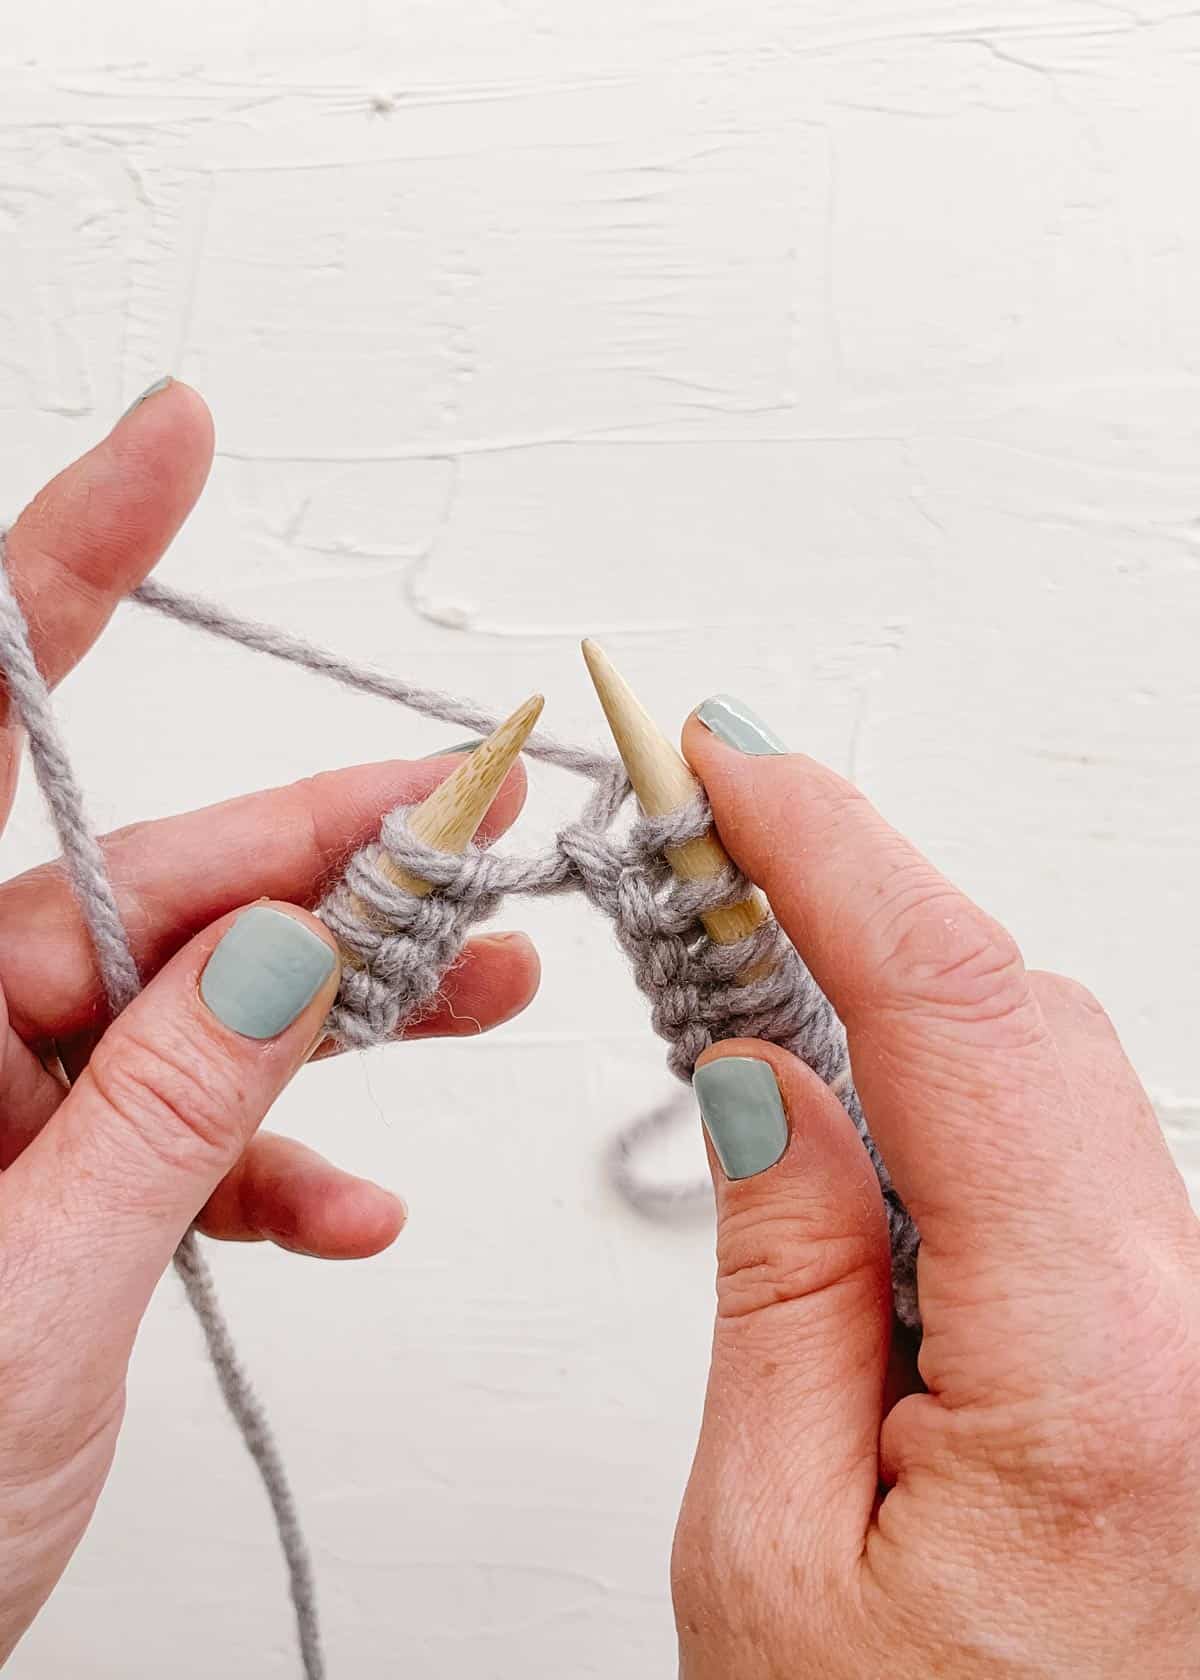
- Hold the working yarn in your left hand. Create tension by keeping your index finger straight, allowing you to easily grab the length of yarn. Use your middle finger to prevent the first stitch from slipping off.
- Insert the right needle through the bottom of the first cast-on stitch, front to back.
- Pick up the working yarn with the tip of the right-hand needle. Pull the yarn through toward you. Again, you can use your middle finger here to prevent the first stitch from sliding off the needle too soon.
- Slide the stitch off the left needle. Readjust the tension of the working yarn with your left index finger. The loop you pulled through is now the first stitch on the right needle.
- Repeat the process with the next stitch on the left needle. Start by inserting the right needle through the stitch, front to back.
- Pull the loop through, transferring the stitch off the left-hand needle. Use your middle finger to control the stitch and stop it from slipping off.
- Continue making every stitch in the row following the above steps.
Transfer the right needle with the first row of stitches to your left hand. This needle now takes the role of the left needle while you work the next row. Repeat steps 1-8 to knit the stitches in each row.

Hold the working yarn taut with your index finger.
Insert the right needle into the first stitch.

Pick the working yarn with the tip of the right-hand needle and pull the yarn towards you.
Slide your first stitch onto the right needle and readjust the tension.

Insert the right-hand needle into the next stitch on your left needle.
Pull the working yarn through to the front and transfer the stitch off the left-hand needle.
Create new stitches all along the row.
Swap the right needle to your left hand and begin the second row.
How to Avoid Adding Unwanted Stitches
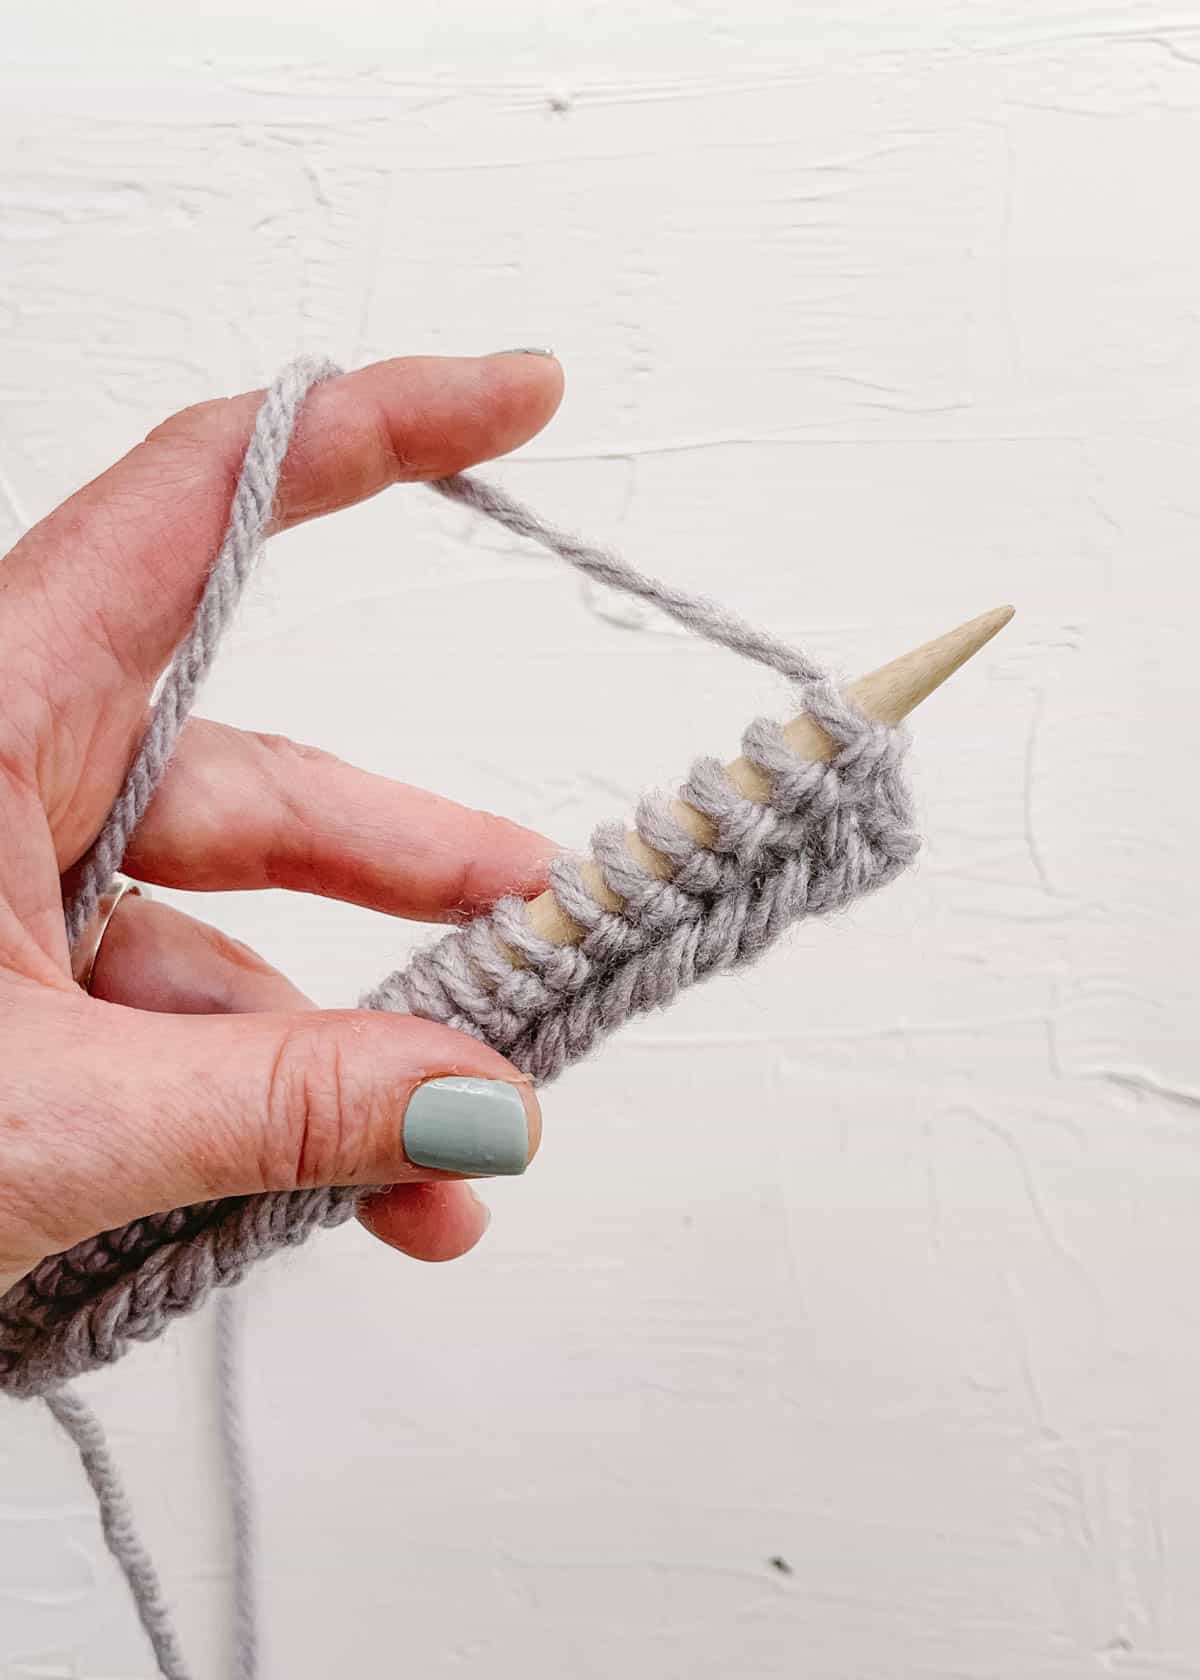
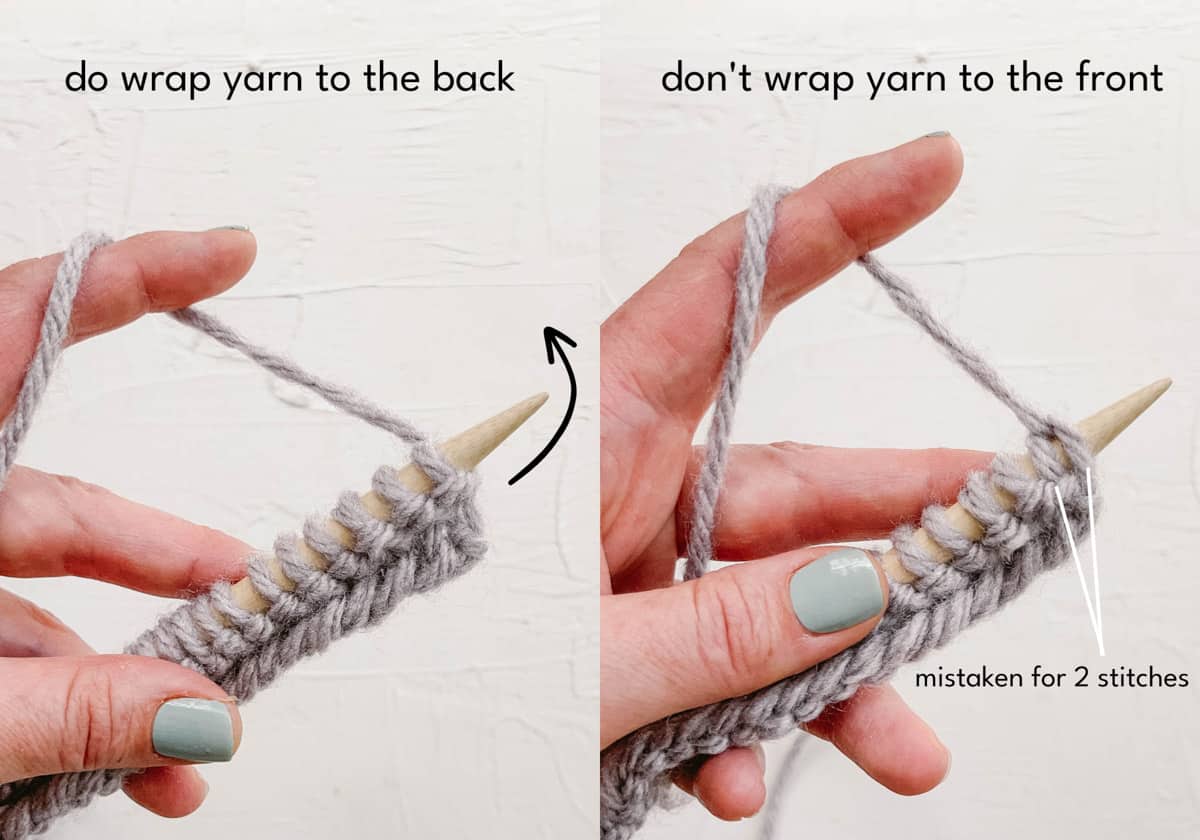
When beginning a new row, pay special attention to how you are holding the working yarn. If this yarn is wrapped to the front of the needle, it is easy to mistake the first stitch for two stitches.
Knitting into both strands will add an extra stitch to each row of knitting. You may end up with a triangle-shaped swatch if you repeatedly make this mistake. Avoid this confusion by double-checking that the working yarn is passing around the back of the needle up to your left index finger.
How to Bind Off
You’ve finished knitting your creation, but how do you get it off those needles?
Binding off, also known as casting off, is the process taking your finished knitting project off the needles. It’s not nearly as scary as it sounds!
Casting Off Step-By-Step
Some beginner knitters are intimidated by learning how to cast off in knitting. But once you practice a time or two, you’ll have no problem getting your knit pattern off the needles and into your hands.
When you’re ready to cast off, follow these steps to finish your project:
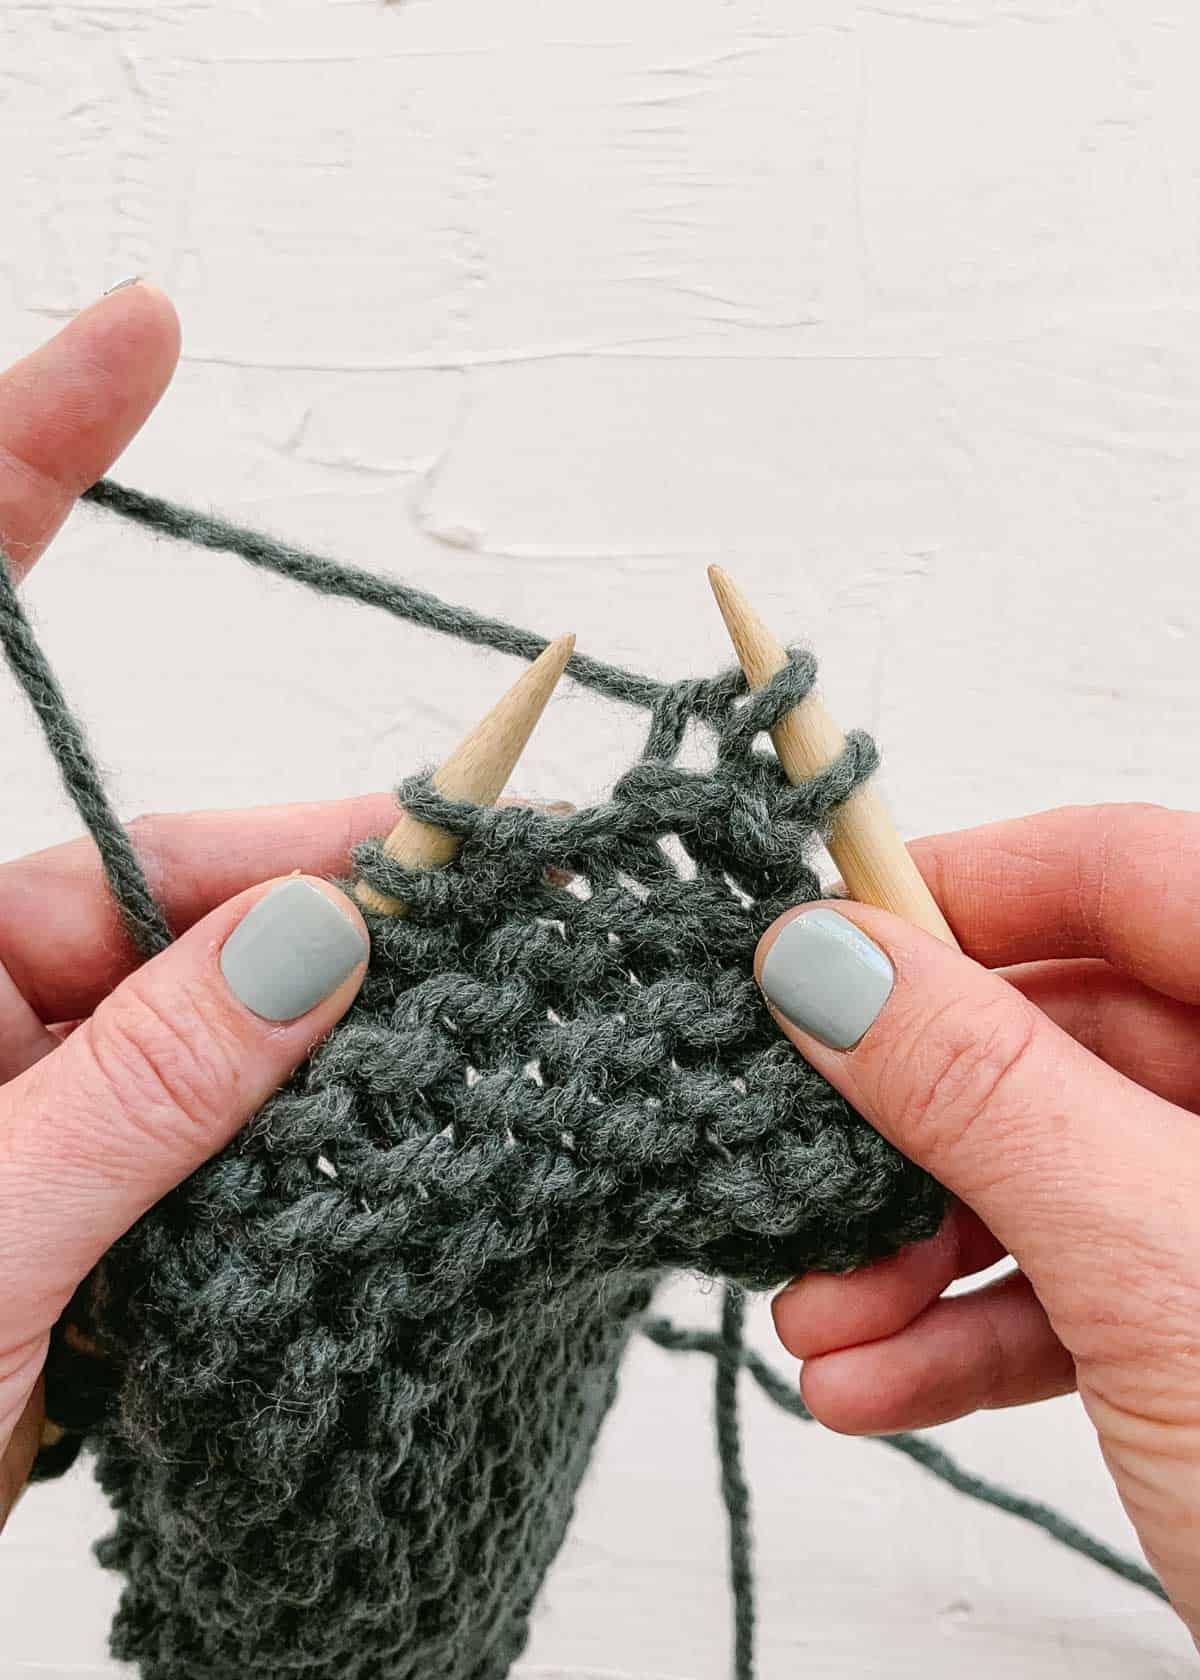
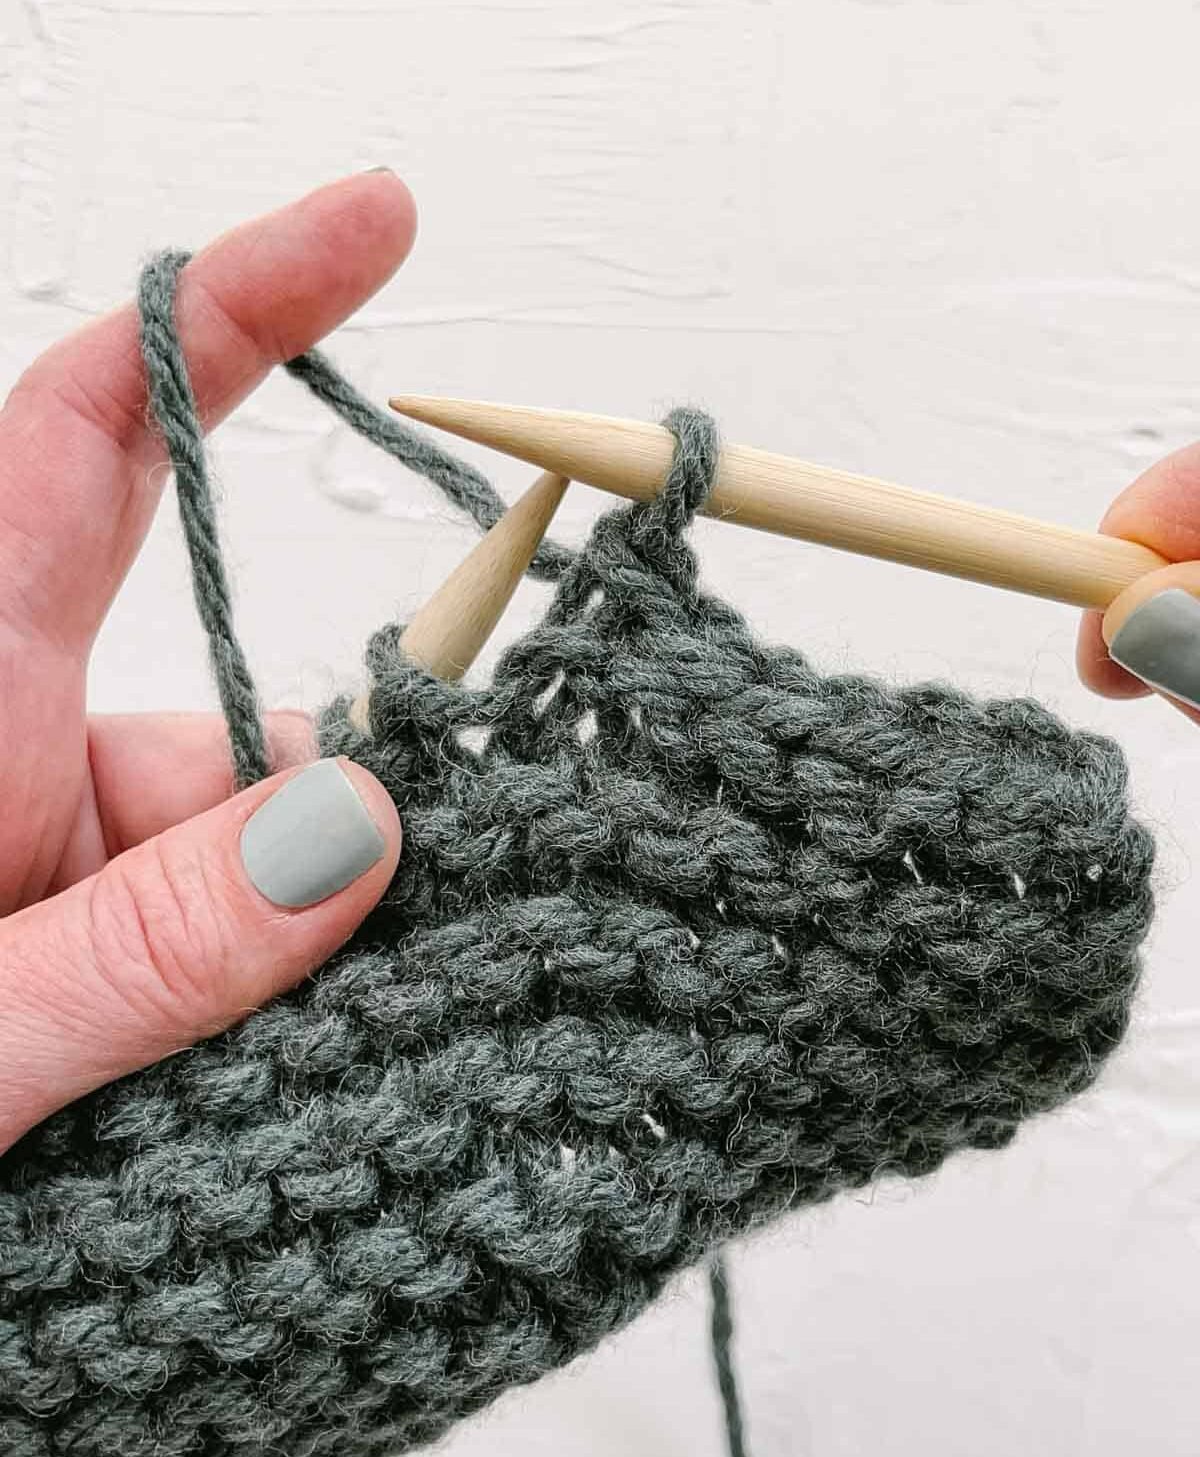
- Knit the first two stitches of your binding off row as usual.
- Use your left needle to pull the first stitch you knitted over the second one.
- Drop this first stitch off your left needle. (You’ve now cast off one stitch.)
- Knit one more stitch.
- Use your left needle to pull the rightmost stitch of the two stitches over the stitch you just knitted.
Create two knit stitches as normal.

Pull the first stitch over the second.
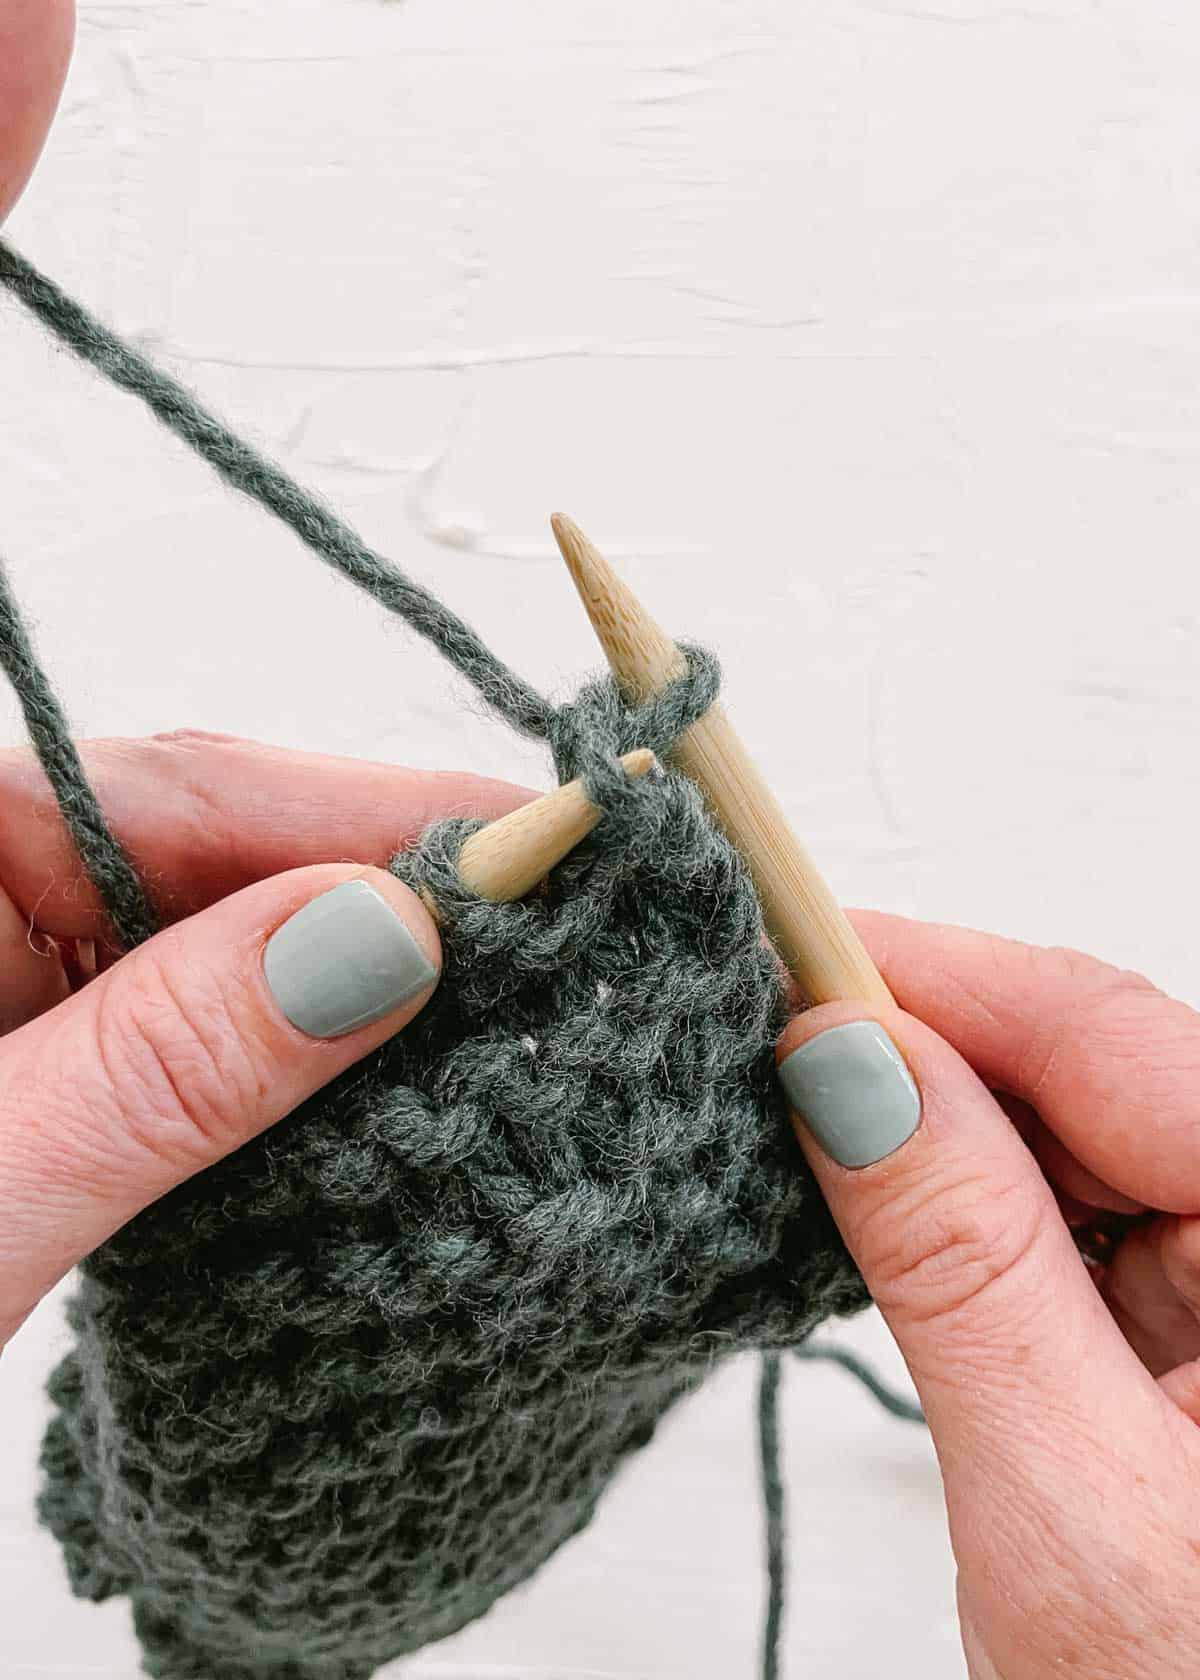
Slip the first stitch off the needle.
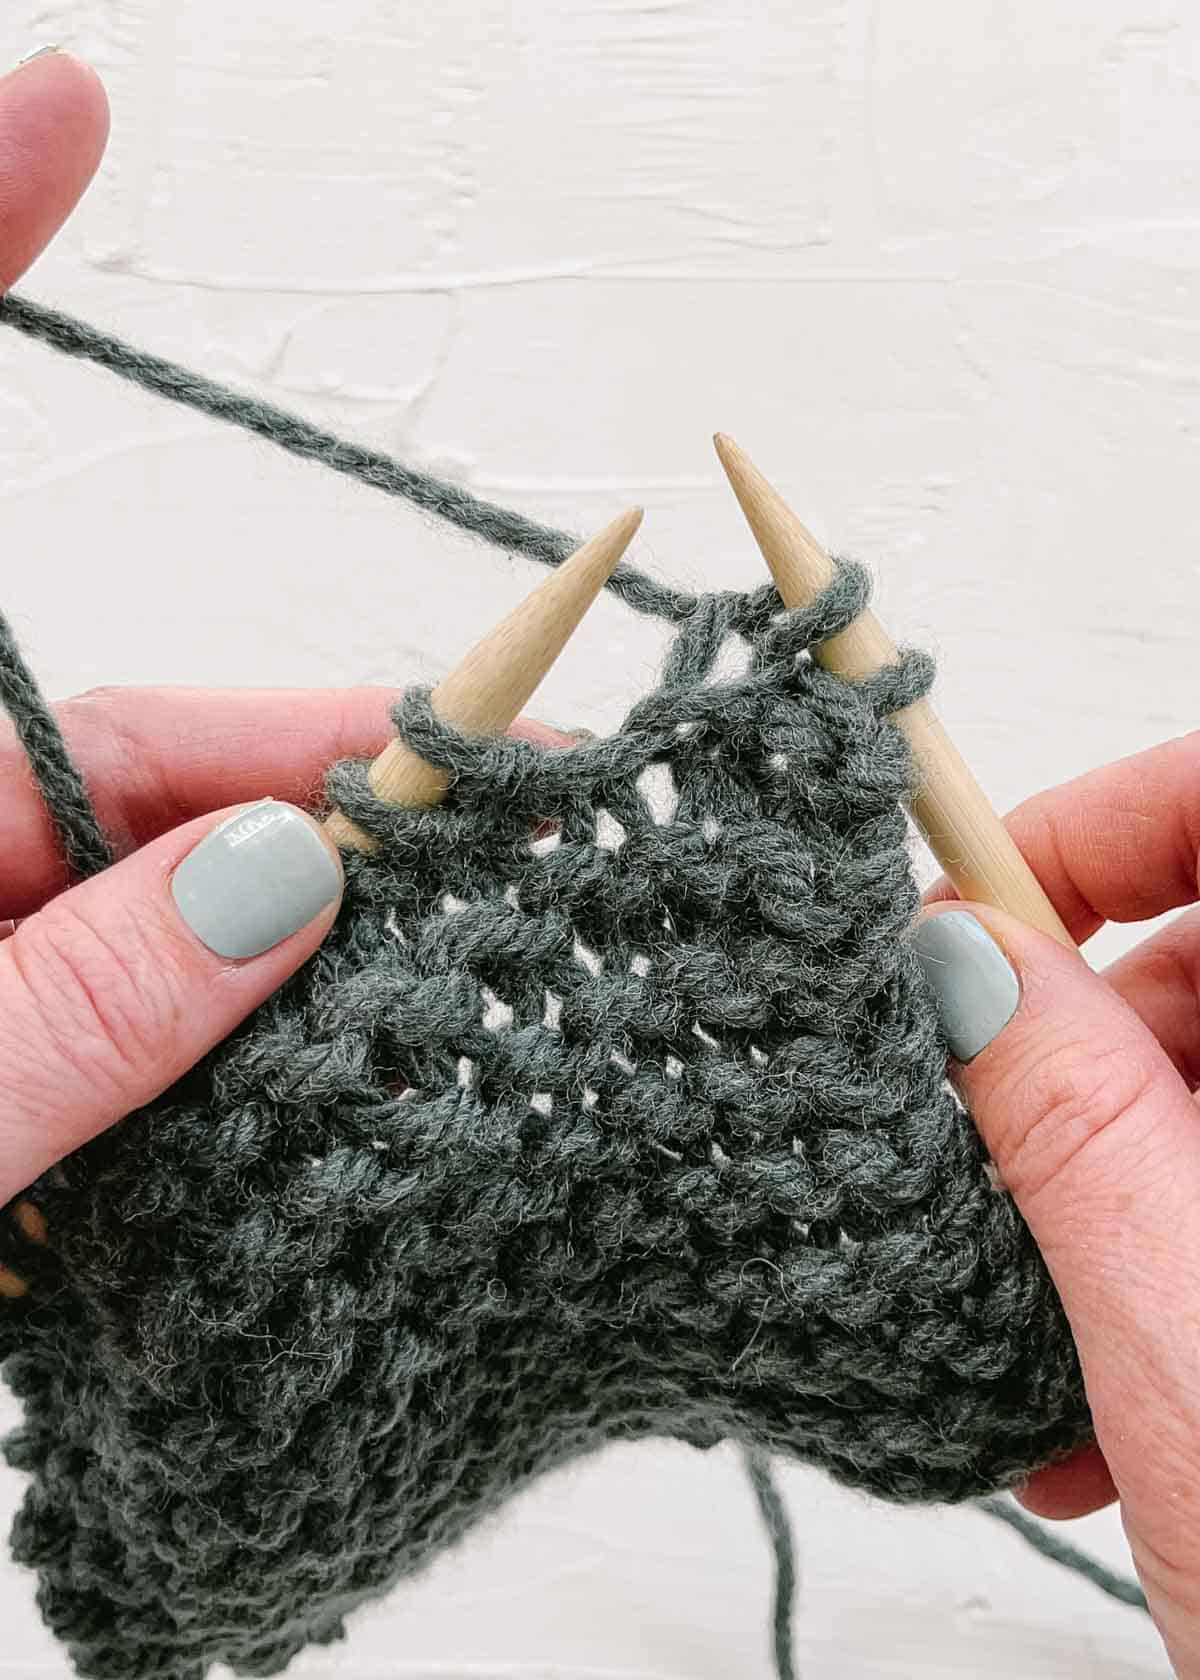
Make another knit stitch.
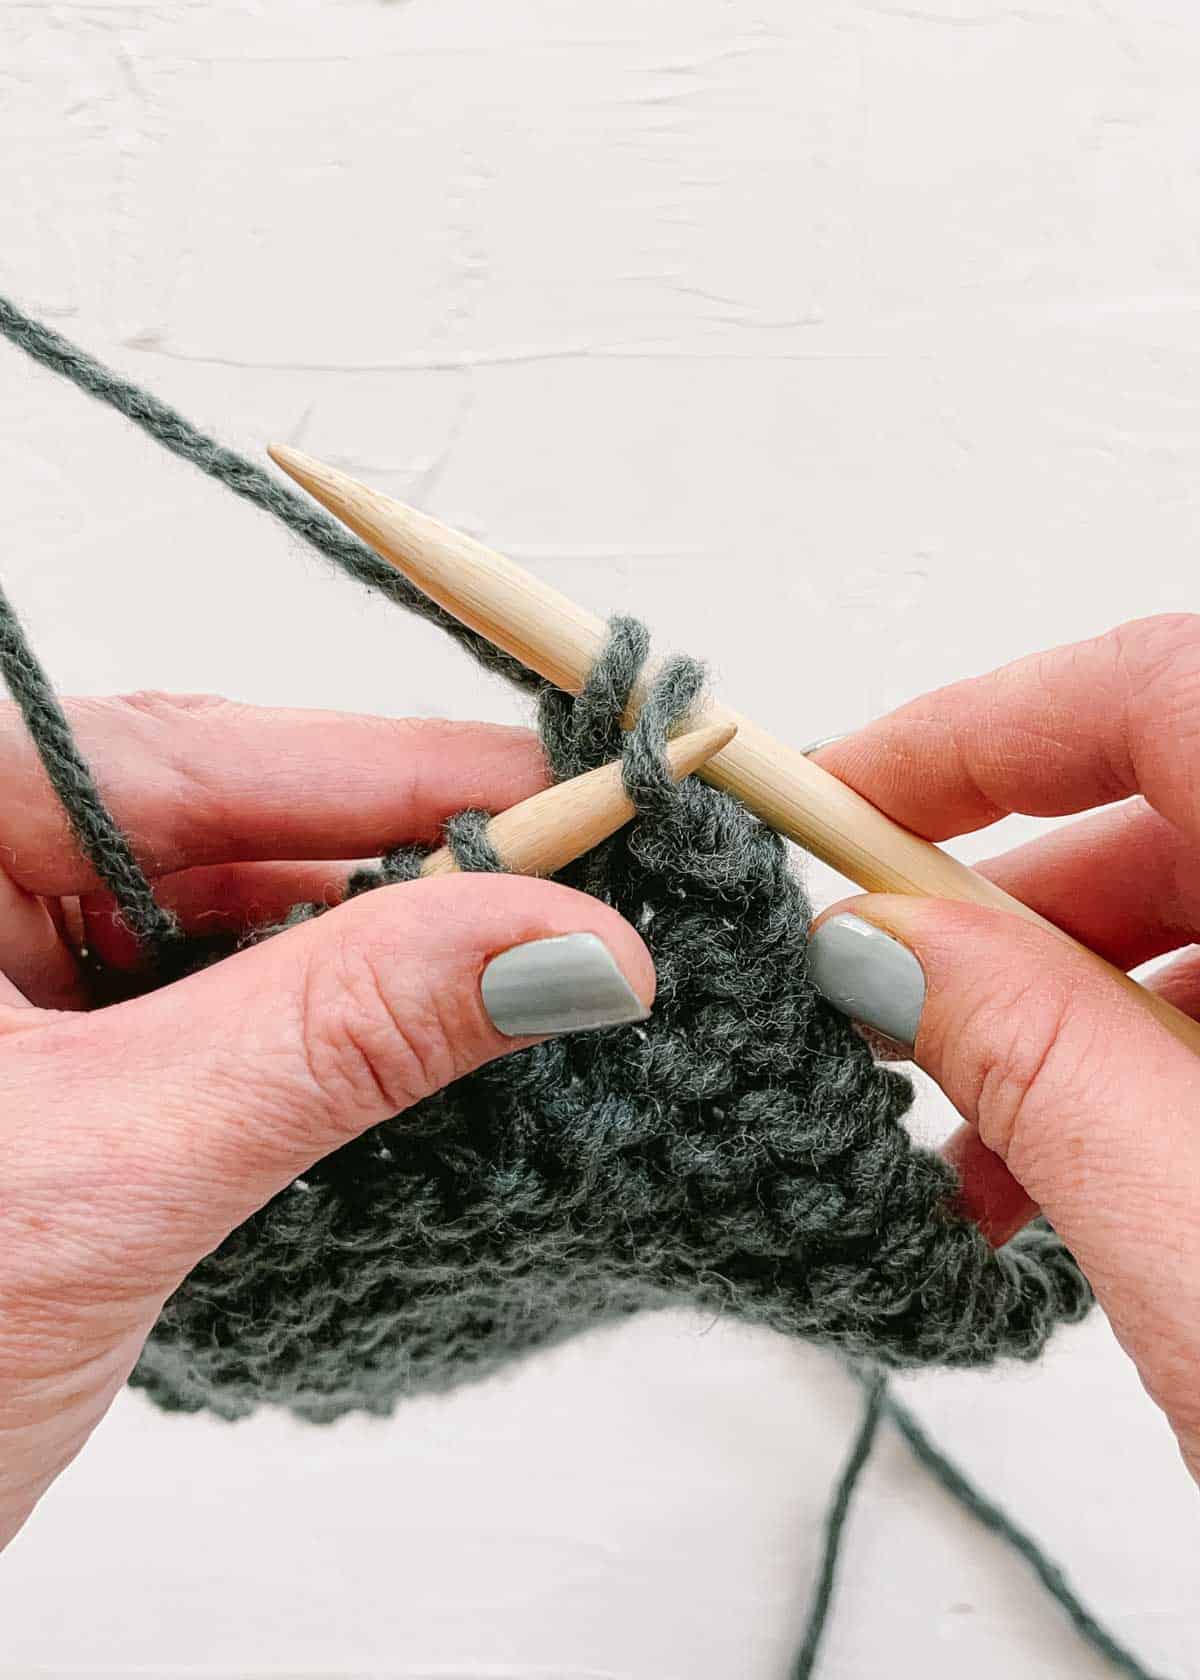
Pull the rightmost stitch over the stitch closest to the tip of the needle.
TOP TIP: Use your thumb to hold the one stitch down on your right needle.
Pro Tip: If you are a tight knitter, bind off with one needle size larger. This will keep the cast-off edge stretchy and neat.
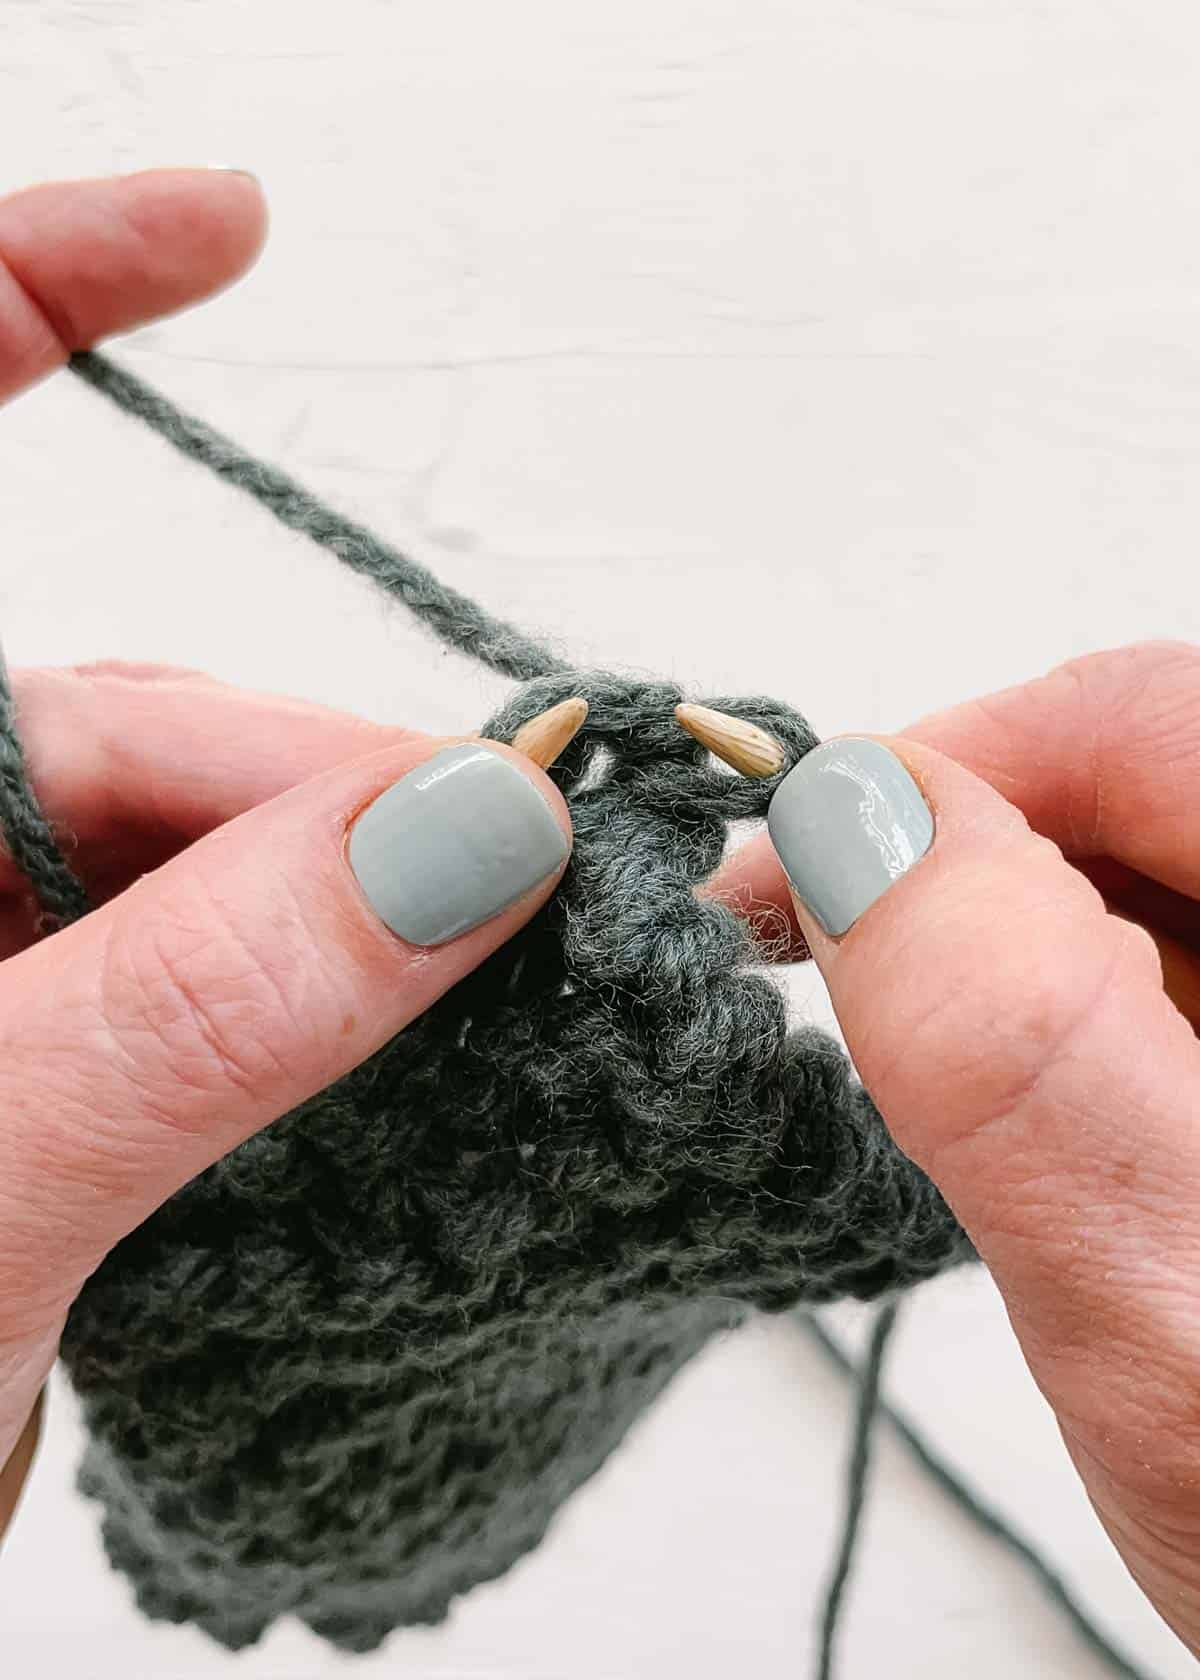
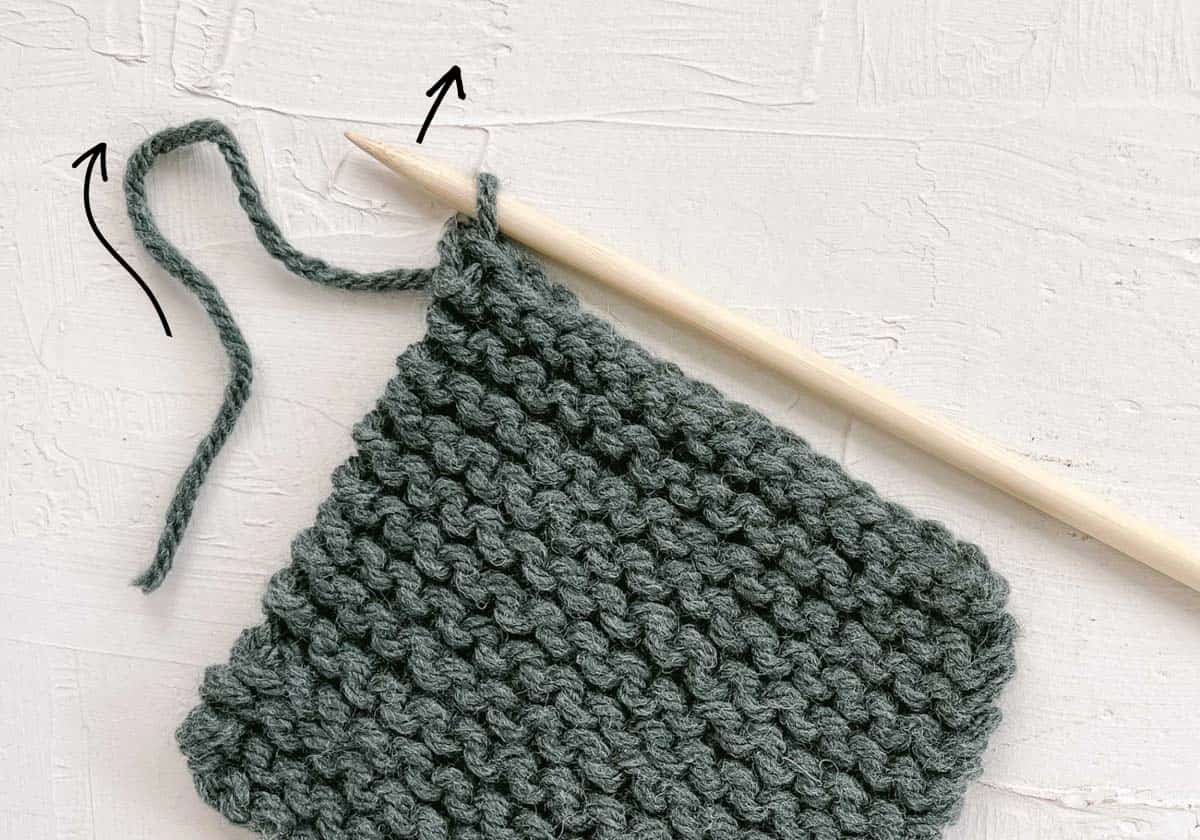
Fastening Off the Last Stitch
Once you are left with one stitch on your right needle, set your left needle down. Cut the working yarn to a six-inch tail. Pull this end through the final loop that remains on the right needle.
Now all you have to do is weave in that loose end. Let’s discuss this final step in learning how to knit!
How to Weave in Ends
Weaving in the ends is the last step to achieving a smooth finish for your project and ensuring your hard work does not unravel. This involves tucking away loose tails of yarn that are left from any color or skein changes.
It is best to weave in ends on the side of your project that will not be visible when you are using it. In knitting instructions, you will see the terms “right” side and “wrong” side referring to which side is visible while being used.
For reversible stitches that look good on both sides, pay attention to the pattern you are using. It may still refer to a “right” and “wrong” side depending on how the item will be used. If your project doesn’t have a “right” and a “wrong” side, do the weaving on the side that you’re more likely to use as the back of the item.
Here’s how to weave your yarn tails into your finished knitting:
Step 1. Thread Needle
To begin, grab your tapestry needle and flip your work over to the “wrong”, or less visible, side. Many people find weaving in through purl stitches more effective as it hides the tail well.
Step 2. Insert Needle In Same Direction As Stitches
Thread the loose tail through the needle and start weaving the needle through the fabric in the same direction as the stitches. For knit stitch, weaving diagonally will produce a neater, less noticeable finish.
Step 3. Change Direction
Sew the yarn through a few stitches one way before changing direction. Remember to gently even out your fabric during this process and check your progress on the other side of the work.
Step 4. Snip Yarn Tail
Once you are satisfied that you have changed direction a few times and created a smooth finish, cut the tail flush with the knitted fabric.
5 Common Beginner Knitter Mistakes
Making mistakes is part of the process when learning how to knit. The best course of action is to learn how to spot and fix these errors if possible. Here are five common beginner mistakes, how to identify them, and what to do next.
1. Dropping a Stitch
Dropping stitches means a loop has fallen off your needle, reducing the number of stitches in the row by one.
Spot a dropped stitch by spreading out the stitches along your needle to look for inconsistencies. Each stitch on the needle looks like a little loop. A dropped stitch creates an open space where the loop of the stitch should be and typically appears as a vertical ladder or column of loose yarn running down the fabric.
Once you have identified a dropped stitch, secure it in place with a safety pin or clip stitch marker. This keeps the stitch from dropping further down before you can rescue it.
Repair the unraveled rows by grabbing the dropped stitch with a crochet hook or another knitting needle. Bring it up through the yarn and onto your knitting needle.
2. Adding Extra Stitches
Adding an unnecessary stitch here or there is a common mistake.
This mostly happens by unintentionally making a technique called a yarn over or by accidentally knitting into the fabric between your needles.
A yarn over involves bringing the working yarn to the front of the needle before knitting the next stitch.
You can identify this mistake by a tell-tale unwanted hole in your work. The best way to avoid accidentally adding a new stitch is to double-check that your working yarn is behind the needle before you make a knit stitch.
If you want to be extra sure, count the number of stitches in the row before you begin knitting. If you see an unwanted stitch in the last row you knitted, it’s an easy fix. Simply slide the accidental yarn over off the left needle when you reach it as you knit the next row. Knit into the stitch afterward as usual.
3 . Knitting Too Tight
Tight knitting can make the following rows harder to knit into. What are the signs you’re knitting too tightly? Stitches being close together and hard to slide along the needle are signs you might need to loosen up.
If you notice you’re knitting too tight during the project, solve it by intentionally sliding all your stitches away from the tip of the needles and onto the thicker body, expanding them. I commonly see beginners holding the yarn too tightly as they focus on learning to knit. With practice, you will learn how to control the yarn while avoiding tight stitches.
4. Not Being Prepared
Read the pattern first so you know what is coming up. Not only will you avoid any unwanted surprises, but knowing what to expect will boost your confidence before you even begin working.
5. Giving Up Too Soon
You may feel all fingers and thumbs, or like the yarn simply won’t do what you want. This is totally normal.
Letting frustration get the better of you can lead to mistakes or simply a negative knitting experience. I promise learning how to knit gets easier each day you practice. If you need to, set your work down for five minutes, then come back to it with fresh eyes and hands.
What’s Next?
Congratulations, you’ve learned the basics of knitting! If you loved it, the best thing to do now is to continue practicing with easy knit projects.
There is no need to rush. Getting really comfortable with casting on, making knit stitches, and binding off will benefit you in the long run. If you’re feeling very keen, reaching out to the knitting community while you learn is a great way to get involved.
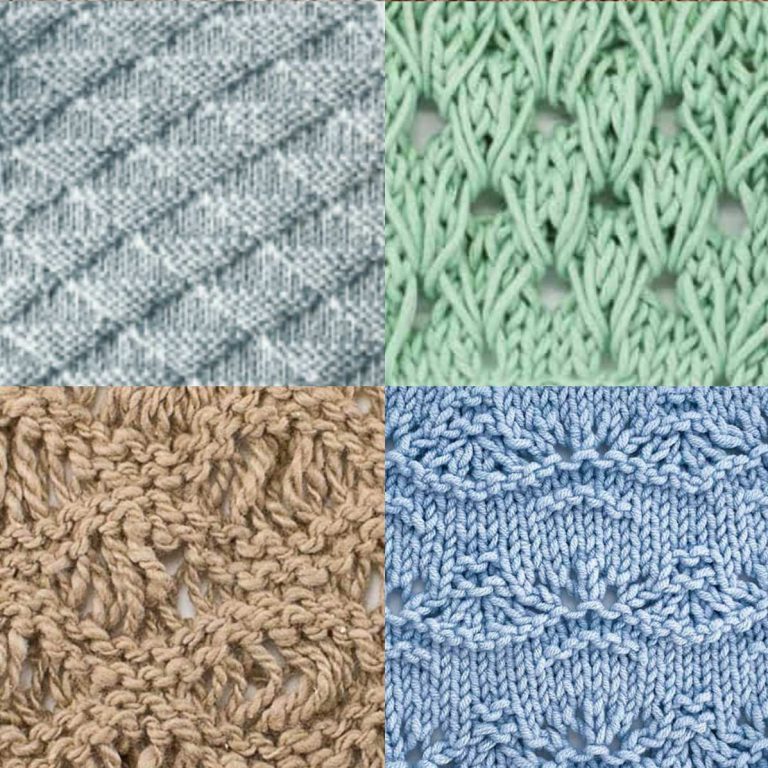
Purl Stitch
Once you are confident in the three foundation techniques, the next step is to learn the purl stitch. Many beginner-friendly patterns incorporate just these two stitches. A world of knitting possibilities, like seed stitch, rib stitch, and stockinette stitch is now available to you.
Finding Inspiration and Community
If you fall in love with the craft, dive deep with the available resources. Along with plenty of helpful tutorials and gorgeous knitting patterns online, you can find other crafters sharing inspiration and information on Ravelry.
If you’re looking for a sense of community, join like-minded knitters in a Facebook group or at your local yarn shop.
More Knitting Inspiration
Put your new knitting skills to work on one of these free patterns!