How to Knit a Blanket: Beginner Pattern For Straight Needles
Learning how to knit a blanket might sound ambitious for a beginner, but it can actually be an easy and satisfying project.
With the right materials, some patience, and a bit of creativity, you can knit a blanket using basic skills and stitches. Soon you’ll have a beautiful, handmade throw that can be enjoyed for years to come.
Get the free beginner knit blanket pattern and tutorial below or purchase the ad-free, printable PDF.
This beginner throw blanket knit pattern is part of a collaboration with Lion Brand Yarns. This post contains affiliate links.
What Kind of Knitting Needles For a Blanket?
When considering a knit blanket project, you may wonder whether to use straight or circular needles. Both types have pros and cons, but ultimately, the choice depends on the construction of the pattern and your personal preferences.
I like knitting blankets with straight needles and circular needles. Here’s why.
Benefits of Circular Needles
Circular needles are the go-to for knitting larger projects, like blankets, afghans, and some sweaters. These needles consist of two needle tips connected by a flexible cable, allowing you to easily accommodate a large number of stitches.
Many knitters find that this reduces strain on their wrists because the weight of the stitches is better distributed (often across your lap!)
Don’t let the name confuse you though, knitting a blanket on circular needles doesn’t mean you must knit in the round. You can still knit flat by working back and forth in rows, just like with straight needles.
Benefits of Straight Needles
Using straight needles (aka short needles) to knit a blanket is possible, and it usually involves some seaming. The key is to break the blanket into smaller, more manageable pieces so that the width or weight of the project doesn’t become a problem.
When knitting an afghan with straight needles, you make each piece separately and sew them together at the end. This way, you don’t have to worry about your needles not being long enough to hold all the stitches. Plus, you get that awesome hit of dopamine every time you finish a strip!
Knitting a blanket with straight needles is my favorite approach for beginner knitters.
Why I Suggest Straight Needles For Beginners
Before you run out to buy a new set of circular needles, hear me out on why beginners should knit their first blanket using straight needles.
First, I’ve found straight needles to be less intimidating to new knitters. Using straight needles requires that your blanket is knit in smaller sections, so each piece is a manageable project on its own.
In addition, beginner knitters can feel a sense of satisfaction after finishing each section while avoiding the overwhelm of biting off a whole blanket at once. (So many stitches to cast on!)
How To Knit a Large Blanket on Straight Needles
When knitting a blanket with straight needles, the easiest way to avoid unnecessary seaming is to make the blanket in long strips. This method involves knitting two or more separate strips, which are later joined to form a larger blanket.
Here are the basic steps of knitting a blanket with straight needles.
Step 1. Choosing or Designing a Pattern
The first step in knitting a blanket is to choose the right pattern for your skill level. If you’re a new knitter, look for patterns marked “easy” or “beginner.” Because the definitions of these terms can vary, read through the pattern to make sure it really is a match for your skills.
Another option is to design your own easy knit blanket pattern. This gives you the creativity to modify the size and choose the stitches.
Here are some other things to consider:
Blanket Size:
Afghans come in all different sizes, from quick knit lap blankets to king-sized bedspreads. For a beginner blanket, I suggest making a small throw blanket. This blanket size is large enough to curl up in, but it won’t take forever to finish.
Blanket Construction:
When considering what blanket to knit, it’s helpful to look at how a pattern is constructed. Blankets knit in one piece are usually made with circular needles. Each row takes longer to finish, but there is no seaming to do at the end.
Knitting a blanket in individual patches or strips makes it possible to use straight needles, which can be less intimidating for beginners. This method is also more portable if you want to knit your blanket on the go.
Yarn Weight:
A pattern that calls for thicker yarn will be faster to knit and make a chunky, warm blanket. However, bulky-weight yarn can be overwhelming for a light baby blanket.
While it’s possible to substitute, if this is your first time knitting a blanket, I suggest going with the yarn weight the pattern calls for.
Step 2. Choosing Materials
Before you start knitting a blanket, you’ll want to gather the right materials. Let’s look at how to select the best yarn and needles for your project.
Selecting Yarn
When picking out yarn for your blanket, think about the texture and thickness you want your knit blanket to have.
While thinner DK weight yarn will produce drapey fabric, I suggest beginners start with a thicker option. Not only will you end up with a cozier blanket, but you’ll progress faster, which can be highly motivating. Choose a comfortable, soft fiber that is easy to care for, such as acrylic, cotton, or wool blends.
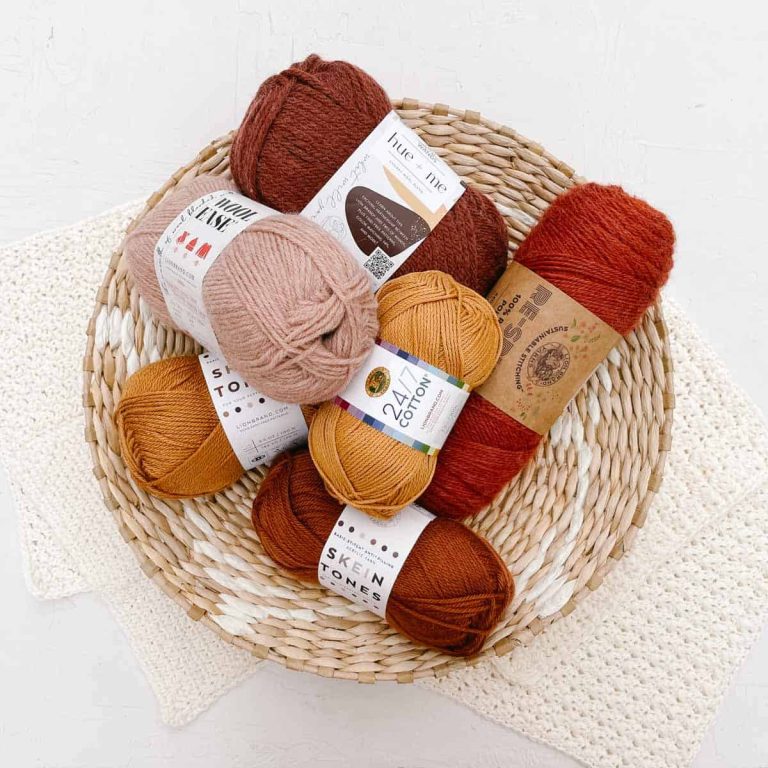
Here are some of my favorite yarns for knit blankets:
| Blanket Yarn | Weight | Why Knitters Love It |
|---|---|---|
| Lion Brand Mandala | DK – CYC #3 | Color changes with fewer ends to weave in |
| Basic Stitch Anti-Pilling | Worsted Weight – CYC #4 | Washable, wears well without pilling |
| Hue + Me | Bulky / Chunky – CYC #5 | Gorgeous mix-and-match color palette |
| Wool-Ease Thick & Quick | Super Bulky – CYC #6 | Visible stitch definition and quick progress |
Picking Needles
We’ve already discussed why you’d choose circular or straight knitting needles to knit your blanket. Another factor to consider is the needle size that will work well with your chosen yarn. Check the yarn label or read your pattern to see the size of needles to use.
Because gauge (aka knitting tension) is personal, it’s always okay to go up or down a needle size if you notice your stitches are too tight or too loose.
Additional Supplies:
There are a few other supplies you’ll want to have available before you start knitting a blanket.
- Stitch Markers: Stitch markers can help you keep track of your stitches and rows. Beginners may find it especially helpful to mark every ten rows of a blanket if they need to re-count all the rows frequently.
- Tape Measure: You’ll want a measuring tape handy to measure your gauge and blanket dimensions.
- Yarn or Tapestry Needle: This is a thicker version of a sewing needle for yarn. You’ll use it to stitch blanket pieces together and weave in your yarn ends.
Step 3. Knitting Your Blanket
Once you’ve chosen your pattern and gathered your materials, it’s time to cast on your first row of knitting.
For blankets, I prefer the long-tail method of casting on. If you’re starting a wide blanket with a lot of stitches to cast on, make sure you give yourself a very long tail (about four times your intended blanket width) so you don’t run out before you have the correct number of stitches.
Follow the instructions in your blanket pattern, checking your gauge before diving into the whole project.
Step 4. Finishing The Blanket
At this point, you’re in the home stretch! Here are the steps to finish your knitted afghan.
Casting Off:
If you’re knitting a blanket with straight needles, you’ll bind off your stitches at the end of each strip. I like to leave an extra long tail just in case I can use it for seaming and avoid adding another tail to weave in.
If you’re using circular needles, you’ll cast off only once the blanket has reached the desired size.
Joining Pieces:
If your blanket was knitted in multiple strips or panels, you need to join them together. One method you can use is the blanket stitch, which creates a neat and secure seam.
There are other basic seaming techniques you can use, such as mattress stitch or whip stitch. Typically, the pattern will tell you what seaming method to use.
If you aren’t happy with how your seams look, experiment with different techniques to find the most invisible join.

Weaving in Loose Ends:
Once all the strips are joined, it’s time to weave in the loose ends. Thread the yarn tail onto a yarn needle and weave it through the fabric of your blanket, following the natural path of the stitches.
Insert it back and forth a few times to secure the yarn, then use scissors to trim any excess. Repeat this process for each yarn tail.
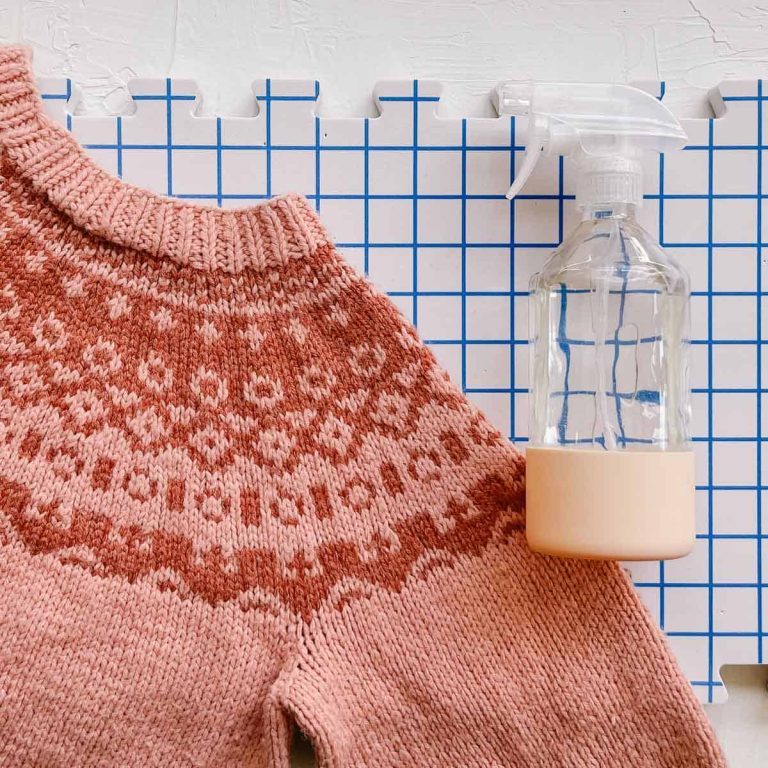
Blocking:
While blocking a knit blanket isn’t always necessary, especially for acrylic yarn, it can help smooth out seams and straighten blanket edges.
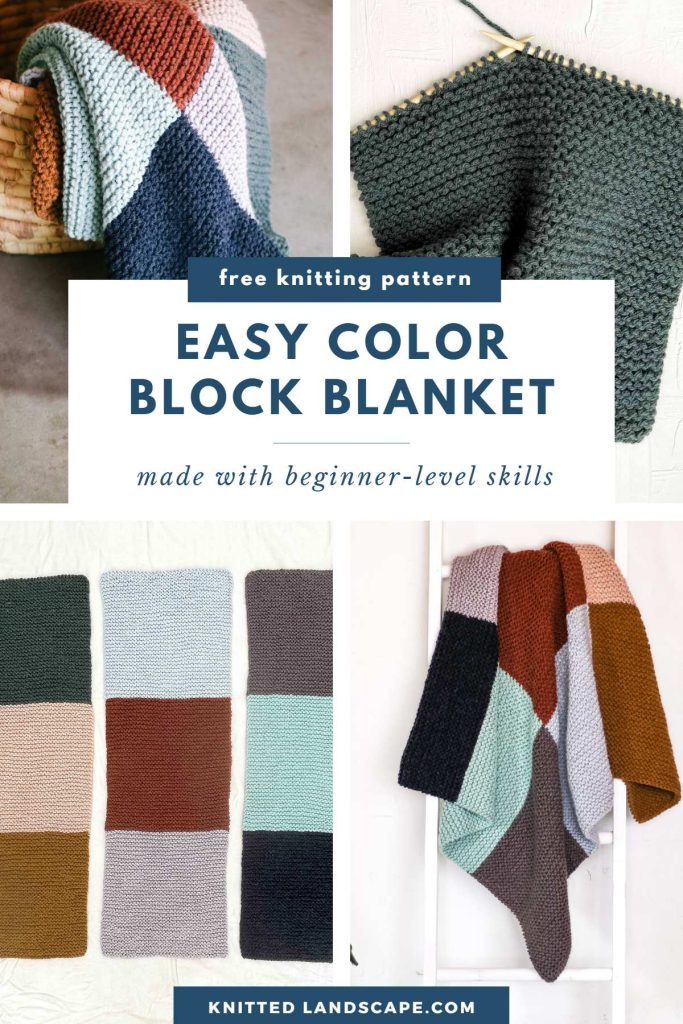
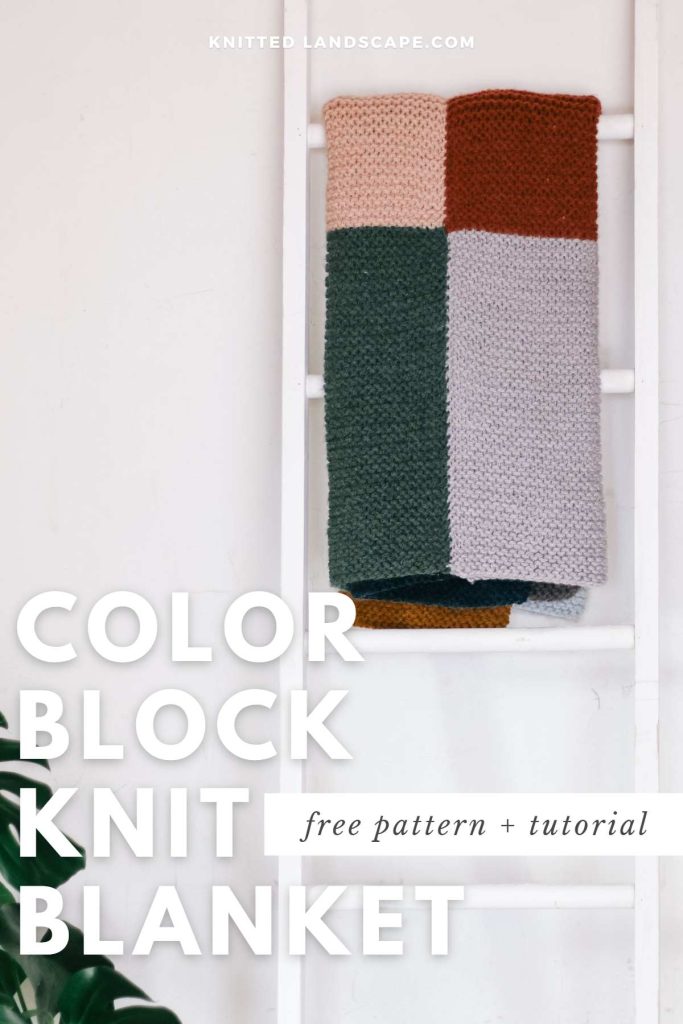
Nove Knit Blanket – Free Pattern
Now that we’ve covered the basic concepts of how to knit a blanket let’s dive into a free beginner pattern.
How to Knit This Blanket
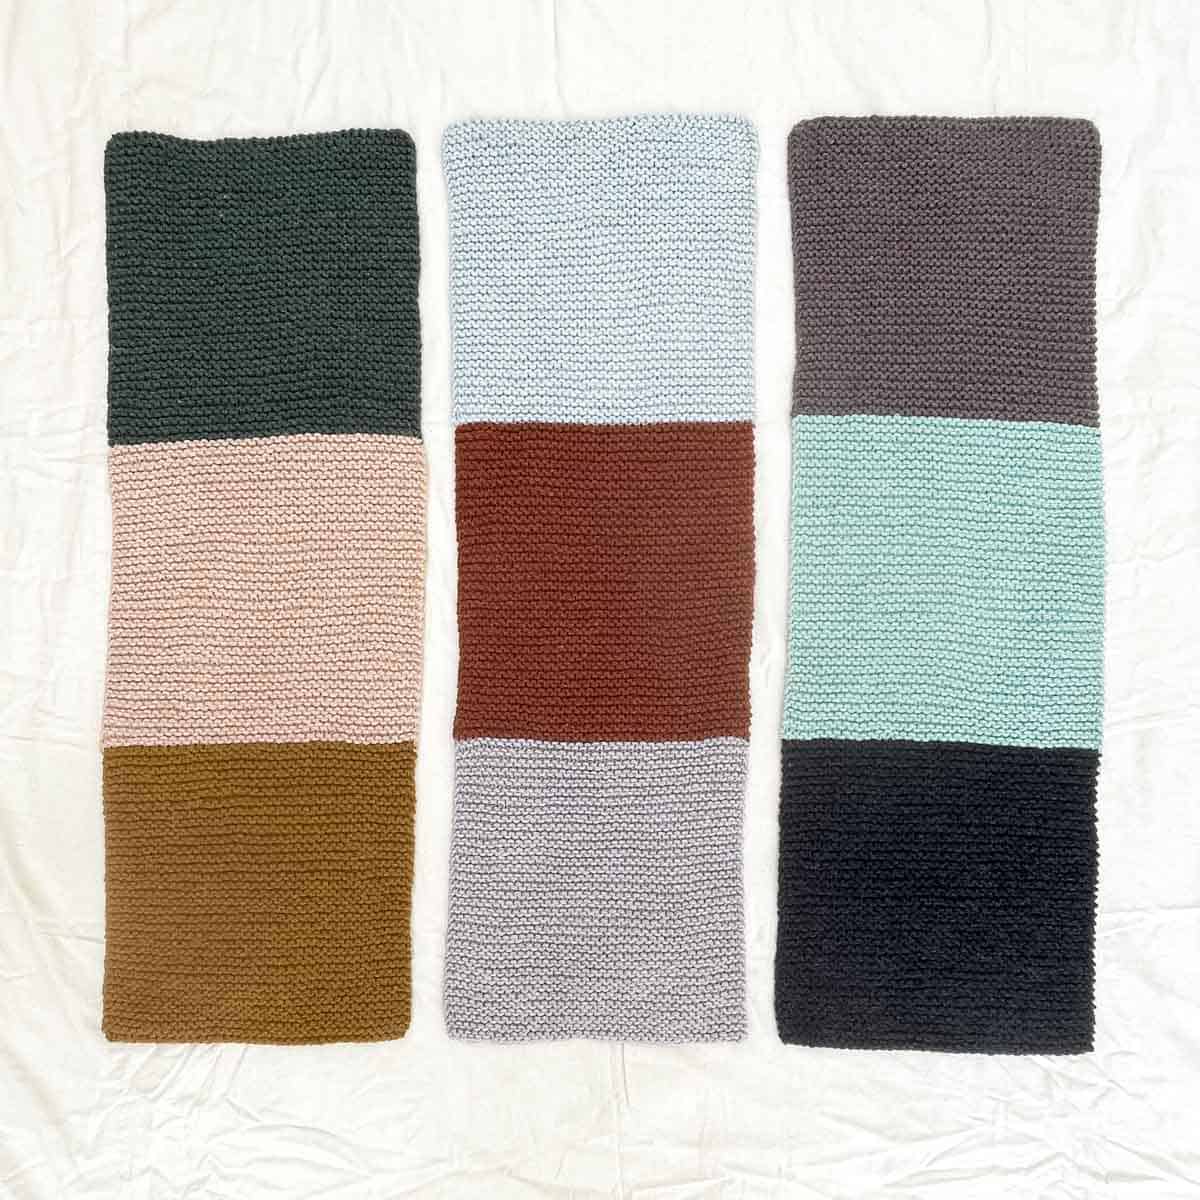
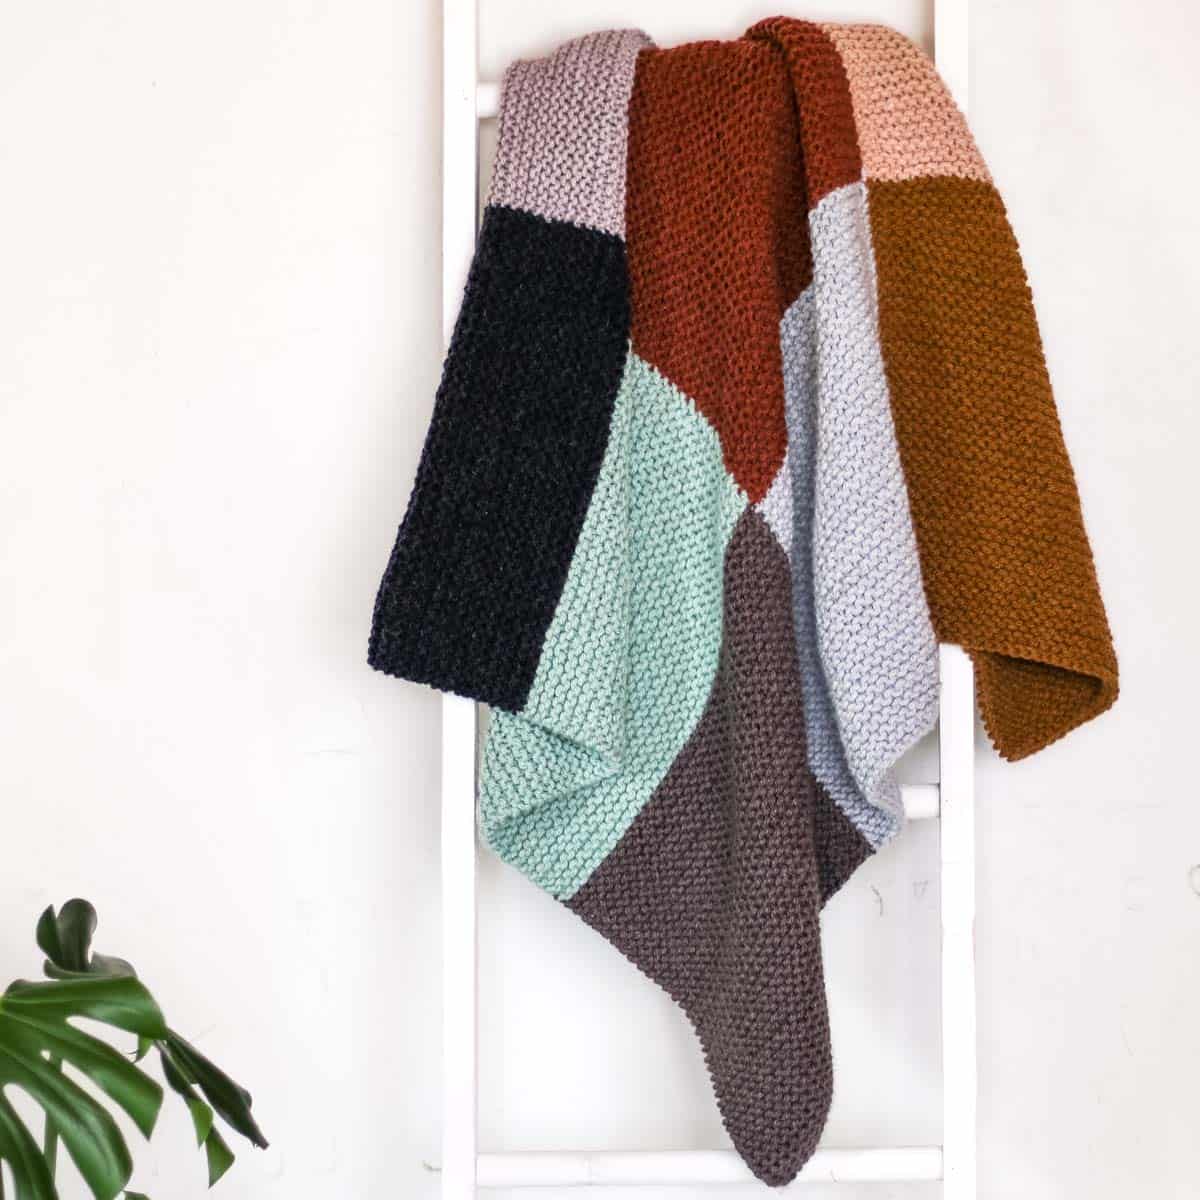
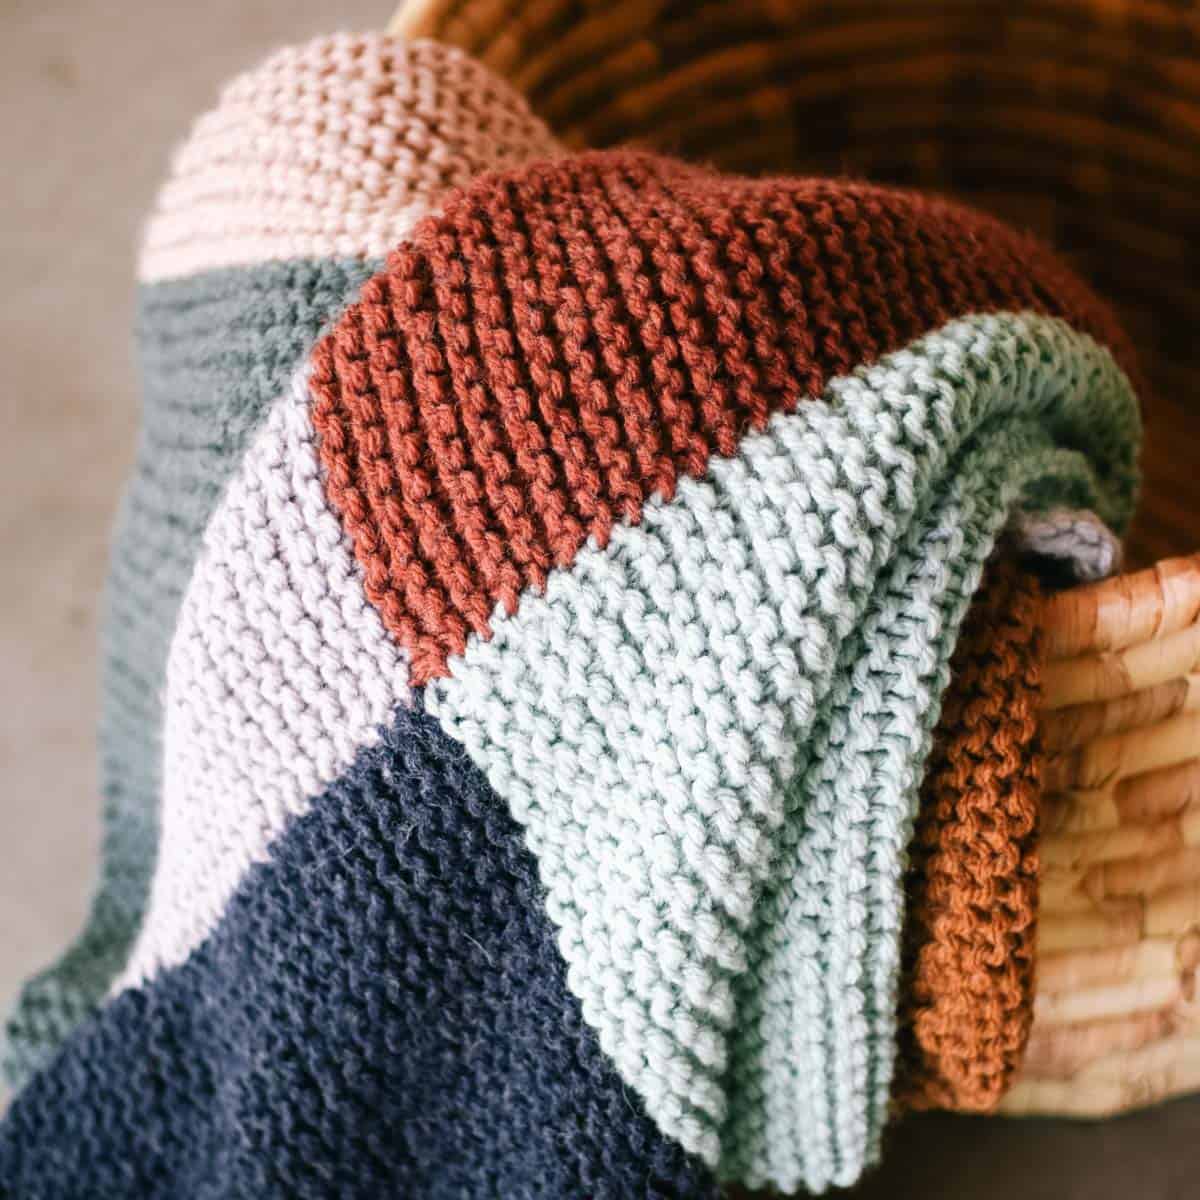
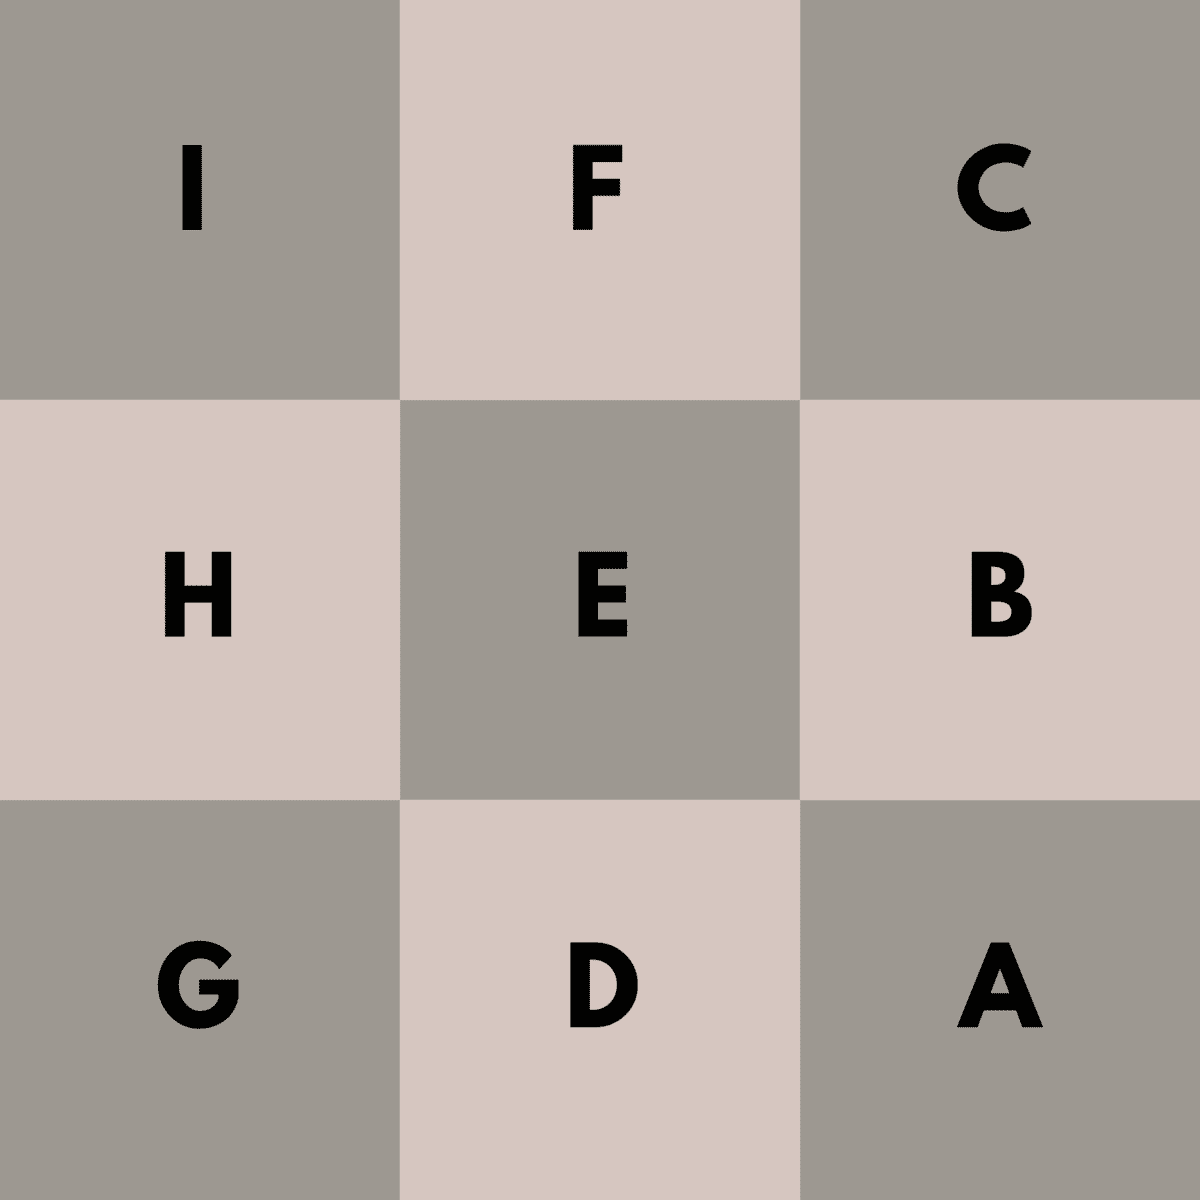
Nine bold color block squares make this beginner knit blanket a modern statement piece. The patchwork pattern is created in three strips, allowing you to comfortably knit a blanket with straight needles while eliminating much of the seaming.
You’ll practice garter stitch, changing colors, and basic seaming techniques in this beginner pattern.
Skill Level
This easy knit blanket pattern is ideal for confident beginners.
All-in-One Knitting Kit
If you don’t live near amazing yarn stores or if you just like to get fun packages in the mail, the all-in-one kit is a perfect way to knit your Nove Blanket. This bundle from Lion Brand includes all the Hue and Me yarn you’ll need, plus a bonus printable PDF of the pattern (delivered digitally).
Supplies + Materials
Order an all-in-one kit from Lion Brand here.
• Lion Brand Hue and Me (Weight: 5/Bulky – 137 yds, 4.4 oz/125 g)
– Color A: Juniper [617-178AA] – 1 skein (approx 92g)
– Color B: Desert [617-099U] – 1 skein (approx 92g)
– Color C: Arrowwood (617-132AA) – 1 skein (approx 92g)
– Color D: Ozone [617-105AQ] – 1 skein (approx 92g)
– Color E: Spicy (617-134) – 1 skein (approx 92g)
– Color F: Haze [617-144AH] – 1 skein (approx 92g)
– Color G: Shadow [617-150AZ] – 1 skein (approx 92g)
– Color H: Sea Glass [617-172S] – 1 skein (approx 92g)
– Color I: Peacoat (617-110AU) – 1 skein [(approx. 92g)]
• Size 11 (8 mm) straight knitting needles or size needed to obtain gauge
Measurements
48 x 48”
Gauge
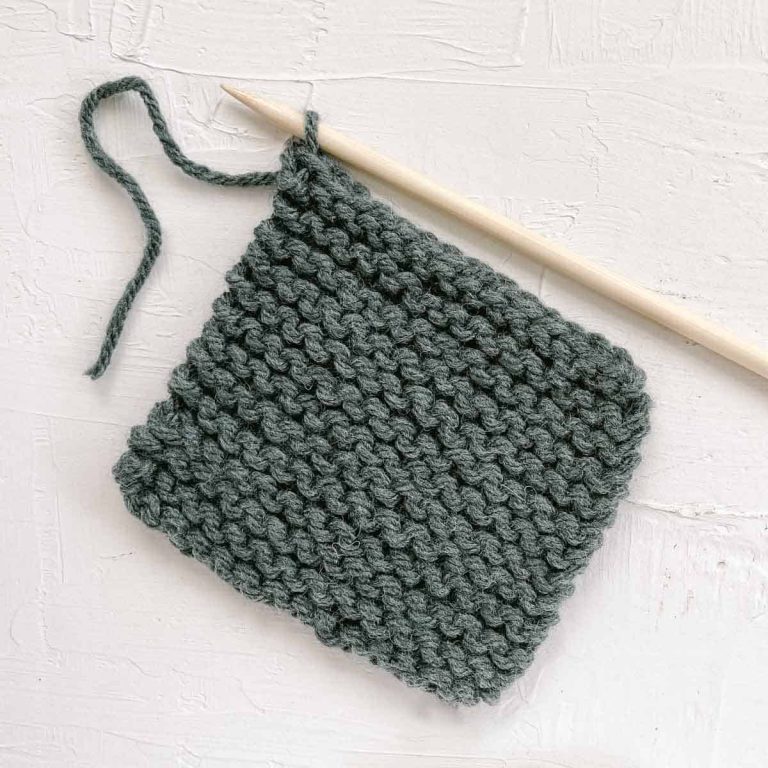
9 sts x 18 rows = 4” as worked garter stitch (knit every stitch)
Pin now, knit later: click to save this free blanket pattern
Abbreviations + Glossary
k – knit
RS – right side
sts – stitches
Print This Pattern
Prefer to crochet on the couch? Need a portable, printable pattern? You’ll love the premium PDF! The instantly downloadable, ad-free file is formatted for easy printing and includes the complete pattern, all the photo tutorials, and the color planning chart.
Upgrade to the Printable PDF
formatted for effortless printing and relaxing couch crocheting
Permissions + Copyright:
Please do not publish or share this pattern as your own. You may make items to sell with this pattern. In exchange, please link back this post. Do NOT use our photos as your own sales photos.
Overall Pattern Notes
- Blanket is knit with straight needles in strips that are joined at the end. For a varied, striped look, change colors more frequently to create three stripes with stripes of multiple thicknesses.
- This is an easy blanket to knit comfortably with straight needles, but it can also be knit on circular needles.
- This video is helpful if you get confused counting rows of garter stitch:
Print This Pattern: purchase the ad-free, printable PDF
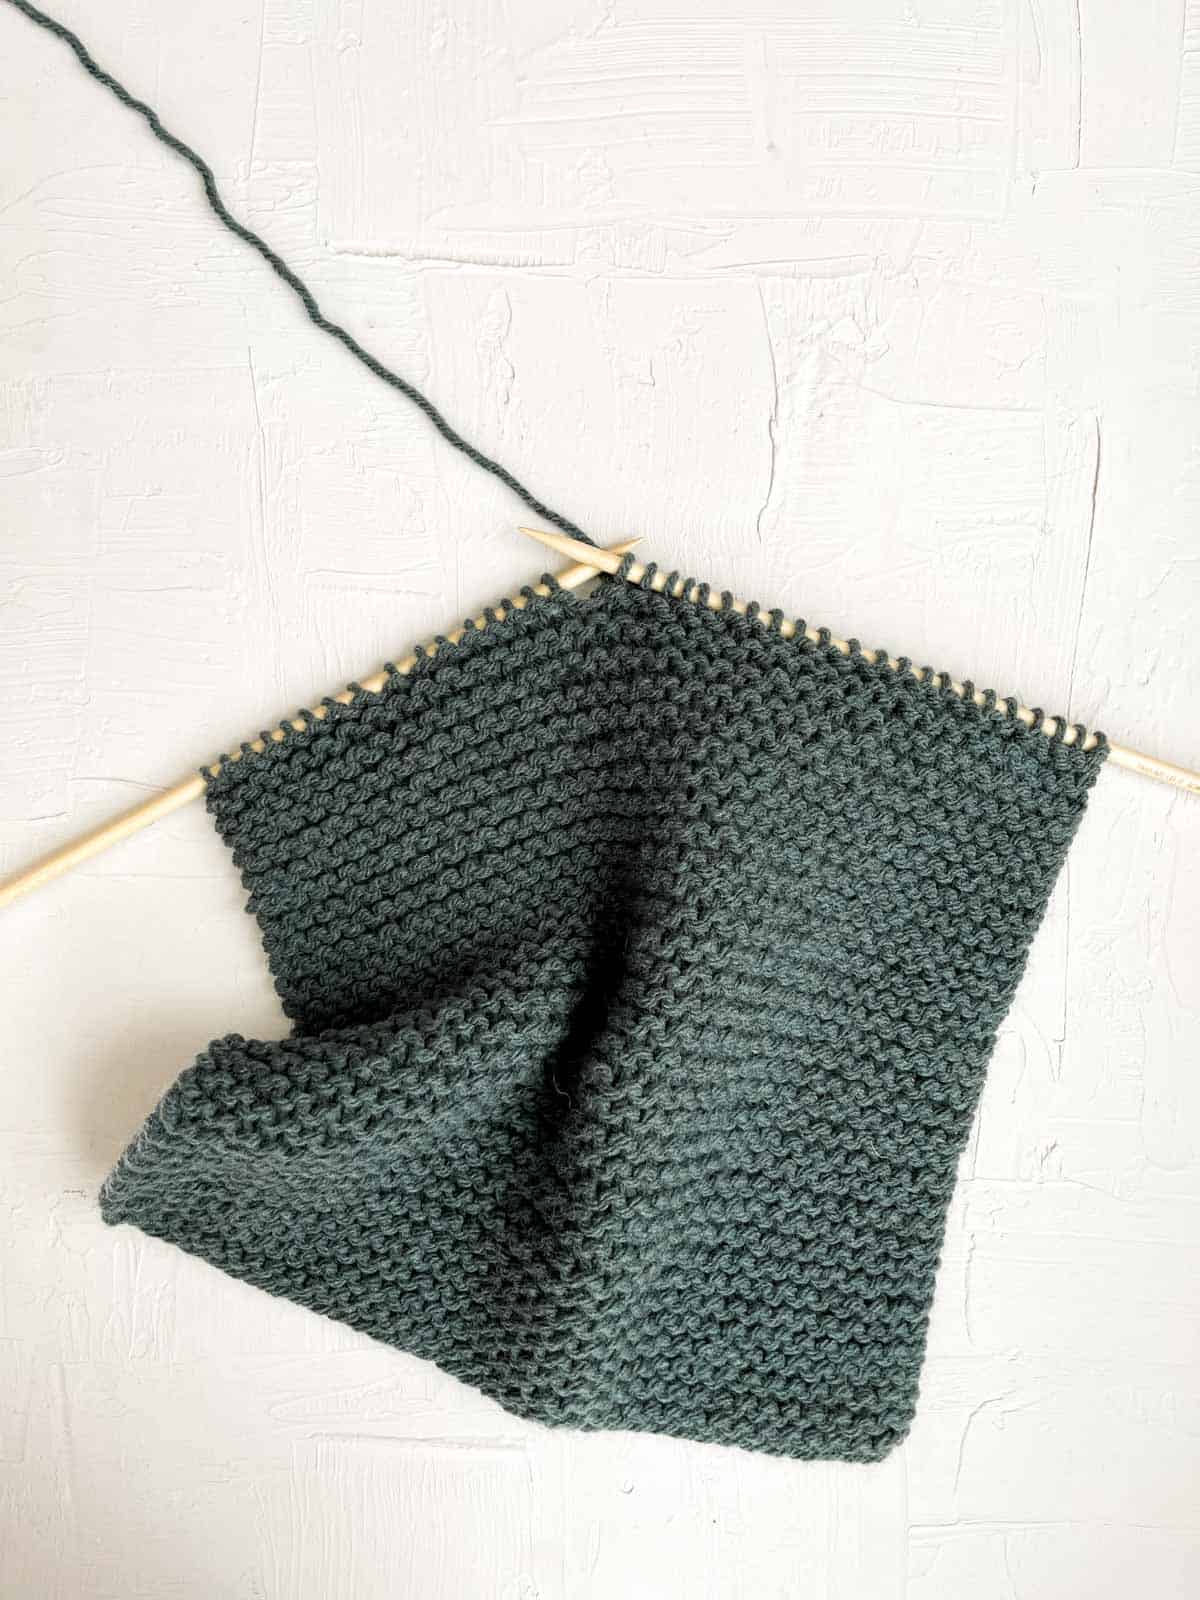
!! Gauge Check !!
This step is important because it will ensure you can knit a complete square without running out of yarn.
Leave a 20” length of yarn, then create a slip knot and place it on the shaft of one needle. The slip knot counts as one stitch.
Using the long-tail cast-on technique, loosely cast on 15 more stitches on the needle. You should now have 16 sts.
Row 1: Knit each stitch.
Rows 2-24: Knit each stitch.
Measure center four inches of swatch vertically and horizontally. Compare to pattern gauge listed above.
- If there are too many stitches/rows in 4”, increase your needle size and re-swatch.
- If there aren’t enough stitches/rows in 4”, decrease your needle size and re-swatch.
Premium PDF
easier and faster with fewer mistakes.
- Complete pattern + photo tutorials
- Instant download
- Formatted for easy printing
Patchwork Blanket Strips
Notes:
- Because each block of color contains an even number of rows, fastening off always takes place on the same edge of the strip.
- To recreate the look of the knitted blanket pictured, use colors A-I in the order outlined below.
To Knit Strip #1:
With Color A: Leave a 45” length of yarn, then create a slip knot and place it on the shaft of one needle. The slip knot counts as one stitch.
Using the long-tail cast on technique, loosely cast on 37 more stitches on the needle. You should now have 38 sts.
Row 1: Knit each stitch.
Rows 2-70: Knit each stitch.
Rather than counting individual rows of garter stitch, you will likely find it easier to count the “ridge” made by two rows. When piece has 34 “ridges,” knit one more row before switching to the next color. On the right side, each finished color block should include 35 “ridges.”
Cut Color A leaving a 36” yarn tail for joining.
Pick up Color B. Repeat Rows 1-70.
Cut Color B leaving a 36” yarn tail for joining.
Pick up Color C. Repeat Rows 1-69.
Final Row: Cast off knit-wise. Cut Color C leaving a 36” yarn tail for joining.
To Knit Strip #2:
Repeat as with Strip #1 using colors: D, E, and then F.
To Knit Strip #3:
Repeat as with Strip #1 using colors: G, H, and then I.

Joining Blanket Strips Together
Notes:
- Existing yarn tails left from fastening off are used for seaming. Use tail that matches one of the two colors of the blocks being joined. For example, when joining blocks A and D, use Color D tail.
Arrange strips as desired with RS facing.
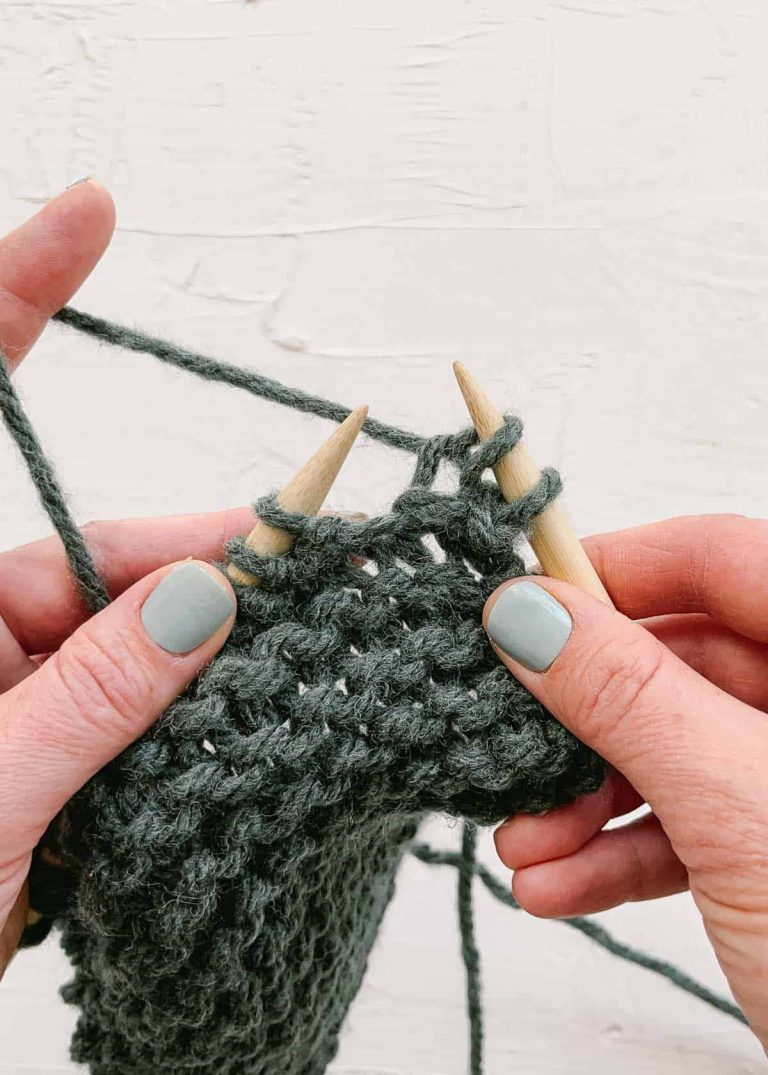
To Join Strips #1 and #2: Use stitch markers to pin edge of Color A block to edge of Color D block. Take care to line up each garter stitch ridge when pinning. With existing yarn tail and tapestry needle, seam edges together.
The edge of each garter stitch ridge includes two loops: one is slightly below and one is slightly above. By working into the alternate top and bottom stitch loops, the seam is nearly invisible.
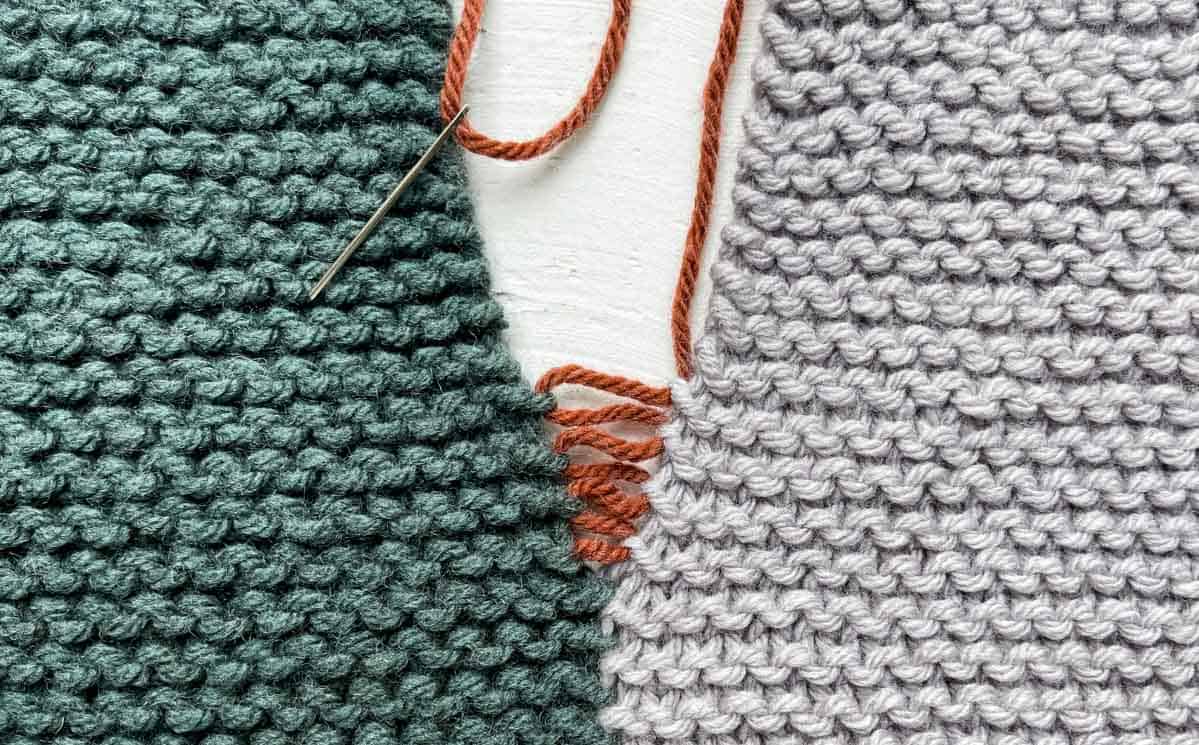
To Seam:
Insert yarn needle into the bottom edge loop on one side, then into the top edge loop of the corresponding stitch on the other side.
Continue to alternate this way until these color sections only are joined. While yarn is threaded on needle, weave in end thoroughly and cut off remaining tail.
Pin edge of Color B block to edge of Color E block. Repeat seaming process.
Pin edge of Color C block to edge of Color E block. Repeat seaming process.
Join Strip #3 to edge of Strip #2 using same process.
Weave in any remaining yarn tails.
That’s all there is to knitting a blanket! Pretty easy, huh? Now we’ll cover a few ways to modify this basic beginner pattern.
How to Knit a Blanket With Circular Needles
If you’re not interested in knitting a blanket with straight needles (or just hate seaming!), you can also make this pattern with 32” circular knitting needles.
This method requires keeping three balls of yarn attached at once, which is why I suggest beginner knitters use straight needles for this chunky blanket.
Here’s how to knit this afghan pattern using circular needles:
- Casting on: Because you’ll be working all three strips at once, cast on the total number of stitches for the entire blanket width. In this case, you’ll cast on 38 stitches in the first color, then 38 stitches in the next color, and finish with 38 stitches in the third color.
- Beginning the blanket: Knit each stitch across the row, using the appropriate color for that section. Do not fasten off each color as you finish that section of the row. Instead, keep it attached for when you pick it up again in the next row.
- Continuing knitting: When your color blocks measure the same width and height, you’re ready to switch to three new colors. Cut the first three balls of yarn, leaving 15” tails for weaving in. Begin knitting the next row using a new color in each section.
Blanket Variations and Stitches
Once you understand the basic concepts of this knitted blanket pattern, you can modify it quite easily.
Here are a few more Nove Blanket variations you can knit with straight needles.
Stockinette Blanket
Stockinette is created by knitting every stitch in one row and then purling every stitch in the next. Alternating rows of knit and purl stitches creates a smooth side (“right” side) and a bumpy side (“wrong” side).
Because stockinette stitch tends to curl, it works well to alternate one “square” of right side texture and a square of wrong side texture. Try using a solid color throughout to make a classic blanket with the look of a quilt.
The corners of a stockinette blanket will still curl, even when worked in a patchwork pattern. Blocking your blanket or adding a crochet border can help it lay flat.
Seed Stitch Blanket
Another interesting stitch pattern for a beginner blanket is the seed stitch. This easy, textured pattern is created by alternating knits and purls within the same row, and then reversing the order on the next row.
Play with the frequency of changing colors to create a “scrappy,” modern-looking pattern. By knitting strips of seed stitch in alternating colors, you can make an easy knit blanket using straight needles.
Chunky Knit Blanket
To create a chunky knit blanket with straight needles, use bulky or super bulky yarn and large needles to follow the basic garter stitch blanket pattern shared above. I suggest Wool-Ease Thick & Quick with size #13 (9.0 mm) knitting needles.
Because thicker yarn will create an even larger blanket, reduce the number of stitches you cast on for each strip if you want to make a smaller lapghan or baby blanket.
Don’t have any thick yarn in your stash? Try holding multiple strands of yarn together. One of my favorite yarns to use for this faux-chunky-yarn technique is Lion Brand’s Pound of Love. It’s economical, even when holding two or three strands together.
Common Blanket + Afghan Sizes
If you’re new to knitting, I recommend starting with a smaller-sized blanket, no larger than a throw.
Beginner Knit Blanket FAQs
You can absolutely knit a blanket without circular needles. To knit a blanket using straight needles, you’ll want to create thinner strips or pieces and use an invisible seaming method to join them together. This approach is often better for beginners and more portable for taking your blanket project with you.
The number of balls of yarn needed for a blanket depends on the knit pattern and the blanket size. An average size throw blanket will use seven to ten skeins of worsted weight or aran yarn.
The easiest knit stitch for a beginner blanket is the garter stitch. The garter stitch is worked by knitting each row of the blanket. It results in bumpy, reversible fabric that looks good on both sides.